Besides a camera and lenses, a filter kit is critical to my landscape photography and is always in my camera bag.
So what filters do you need for landscape photography?
A quality Polarizer is an essential filter to have in your landscape photography kit. Use hard graduated ND filters for scenes with straight horizons. For even horizons, it’s best to have soft graduated ND Filters. Solid Neutral Density filters allow you to take long-exposure landscape photos.
The type of scenes you prefer to shoot will impact the filters you’ll need.
So I will break it down so you can work out what you need for your ultimate Landscape Photography filter kit.
Here’s a quick over of what I recommend for your landscape Filter Kit depending on where you are on your photography journey :
Essentials
If you take no other filters, make sure you have these essentials.
- CPL – Polarizer
- A Cloth
Basic
When you want more control of some of the light in a scene.
- CPL – Polarizer
- 0.6 Hard and Soft ND Filter
- A Bag/Pouch and Cloth
PROGRESSING
This filter kit will be suitable for most landscape scenes.
- CPL – Polarizer
- Extended set of Hard ND Filters (0.3, 0.6)
- Extended set of Soft ND Filters (0.3, 0.6)
- 6-stop ND Filter
- A Bag/Pouch and Cloth
ADVANCED
This Ultimate filter kit will allow you to control the light in nearly every type of landscape scene.
- CPL – Polarizer
- Full set of Hard ND Filters (0.3, 0.6, 0.9)
- Full set of Soft ND Filters (0.3, 0.6, 0.9)
- Full set of Reverse ND Filters (0.6, 0.9, 1.2)
- Extended set of ND Filters (6-stop, 10-stop, 15-stop)
- A Bag/Pouch and Cloth
With each filter impacting the light differently, it can be overwhelming if you are new to the world of filters.
So I will run through all the filters I use and the situations in which I use them. This information should help you when you’re considering your next filter purchase.
However, if you want to dive straight in and get started building the Ultimate Kit for your landscape photography, this is our recommendation.

NiSi Starter Kit
This Starter Kit from NiSi is an excellent way to begin your journey with filters for landscape photography.
How do Filters help with your landscape photography?
You use Filters to control the light as it passes into the camera. Some filters reduce glare and haze, creating a clearer image. Other filters darken brighter areas, so the light is more even across the scene, making it easier to capture a photo with detail.
Let’s look at some of the filters you should consider including in your landscape photography filter kit.
Landscape Photography Polarizer
First, we have polarizers – a polarizing filter is a must-have for any landscape photographer.
Do I need a Polarizer for Landscape Photography?
A Polarizer is an essential filter for landscape photography. A polarizer cleans up scattered light, reducing glare and reflections off wet or shiny surfaces, which can be distracting. It also can decrease haze and strengthen the blues and greens in your scene, enhancing the photo.
I use a Polarizer for over 95% of the shots I take. I use this Filter Holder with Polarizing Filter.
If you are just starting out and don’t want to spend that much, this is a good quality Screw-on Polarizing Filter.
How does a polarizer work?
As light from the sun travels through the atmosphere and bounces around the environment, it scatters, and you have wavelengths of light with different orientations. The effect of this scattered light is the glare you often see coming from wet or shiny surfaces.
As you turn your polarizer, it will block some light coming towards you at specific wavelength orientations. Think of it as cleaning up the light coming into the camera. The colors become stronger, and there is less distracting glare and reflections in the image.
How does a Polarizer improve a Landscape Photo?
A Polarizer reduces the impact of haze, making an image look sharper. By cutting through glare and reflections, a polarizer reveals elements under the water’s surface. Textures of wet rocks and sand are more prominent, and you can get better contrast in moving water captured with slower shutter speeds.
A polarizer can also help produce more vivid colors, particularly blues or greens.
So a polarizer can be helpful in many landscape situations. Plus, the effect a polarizer can have on your image can’t be replicated another way in post with editing software. So for those reasons, a polarizer is a must-have for any landscape photographer and an essential part of my landscape photography kit.
When shouldn’t you use a polarizer?
I don’t use a polarizer when I’m shooting astrophotography. It will have little to no effect on the photo other than reducing the light, so you’ll need to increase your exposure. Also, when shooting the night sky, you are working with limited light, so you don’t want to decrease the amount of light any further with a polarizer.
A polarizer can have a weird shadowing effect on clear blue skies, particularly in the middle of a clear day when the sun is high in the sky. When you use a polarizer in these conditions, darker areas can appear in the blue sky. This effect can be a challenge to fix in post-production, so it’s better to avoid this when you’re taking the shot.
When composing a shot using water reflections in the foreground, I’ll avoid using a polarizer, as it will remove the reflection from the water’s surface.
Be aware placing a polarizer reduces the light by about 1/3 to 2/3 of a stop, so adjust your exposure settings to compensate for the decrease in light.
Neutral Density Filters
What are Neutral Density Filters?
Neutral Density (ND) Filters are consistently dark over the entire filter reducing the light equally across the scene.
ND Filters have a neutral tone, resulting in a minimal amount of color cast in your image. Some filter brands are better than others at not casting a color across a photo.
ND Filters come in different levels of darkness or density.
I have a 6-stop ND (which blocks out 6-stops of light or 18 steps of exposure). So a 1/125 sec shutter speed with no filter would slow down to 1/2s when a 6-stop ND filter is on the lens.
A 10-stop ND is denser, blocking out 10-stops of light. So a 1/125 sec shutter speed with no filter would slow to 8 secs with a 10-stop ND filter mounted.
I use these when I have too much light for the shutter speed I want to use.
When should you use a Neutral Density Filter?
ND filters are helpful in situations where you want to extend your shutter speed but there is too much light.
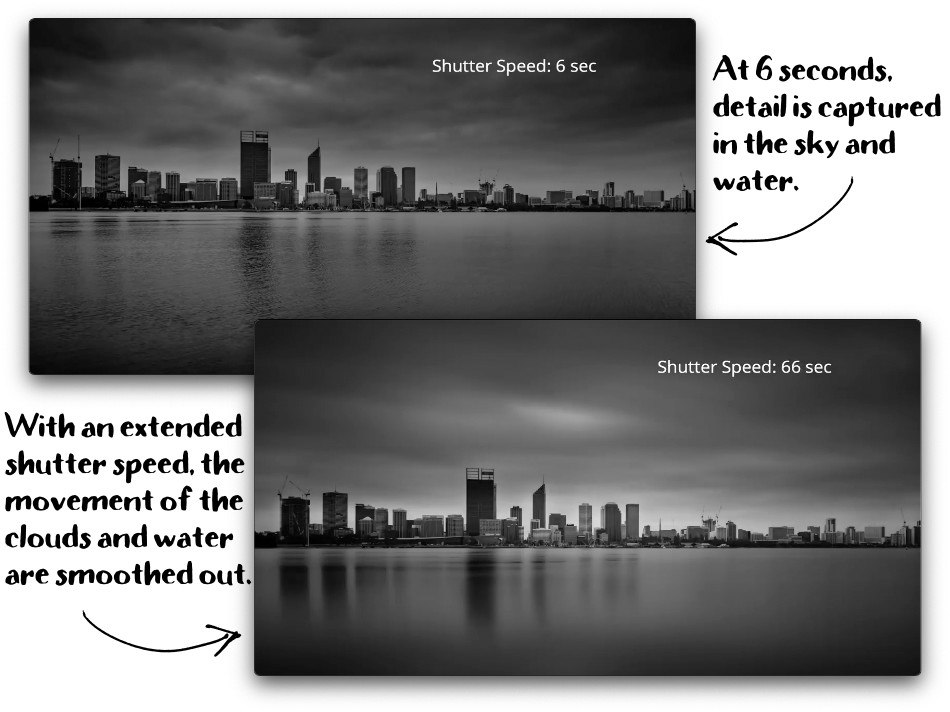
Generally, if there’s plenty of light, you can select a quicker shutter speed to reduce the amount of light. However, if the photo you have in mind requires a longer shutter speed, using an ND filter will decrease the light, allowing you to increase the shutter time without overexposing the image.
ND filters are handy when you want to lengthen the shutter time and create an effect with moving elements in the images like :
- capture patterns of moving clouds in the sky or
- water in a stream or running down a waterfall or
- smooth out small ripples on the surface of the water.
Common scenarios when I’ve used Neutral Density filters are:
- 10-stop ND in the middle of the day to achieve a shutter speed of a few secs.
- 6-stop ND filter when there’s a little less light, like on cloudy days or in the afternoon.
- Using the 10-stop and 6-stop at the same time, I can have 16-stops giving me a few minutes in the middle of the day (1/125 seconds to 4-6 minutes).
Quick Tips for using ND Filters
- When using Square (slide) ND filters, use the groove closest to the lens to reduce the chance of light coming in from the side.
- The more filters you use, the more chance there is for dirt, dust or water droplets that cause marks on your image.
- There is a high chance of lens flare with filters if you point the camera towards the sun.
- For exposures longer than 30 secs, make sure you close off the eyepiece on the viewfinder so light doesn’t leak in the back and ruin your image. The effect will be banding across your photo, which is pretty much challenging to remove. Alternatively, place a dark cloth over the eyepiece to block the light.
Neutral Density Graduated Filters
What is a Neutral Density Graduated Filter?
ND Graduated filters are similar to ND filters. However, the density to not even across the filter. Instead, the filter gradually gets darker from one side to the other.
When would you use an ND Grad Filter?
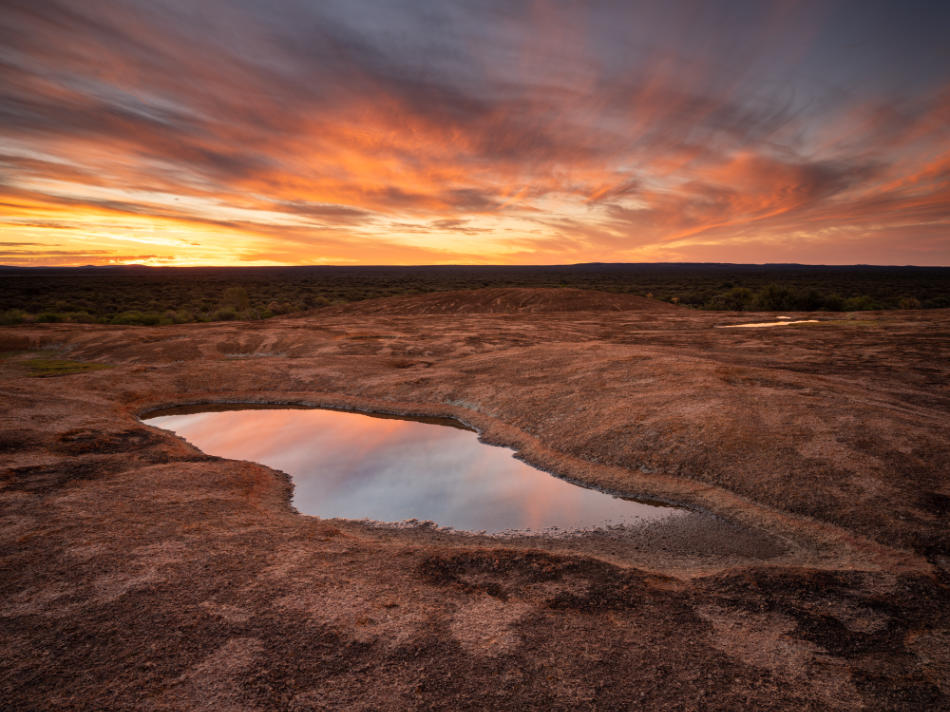
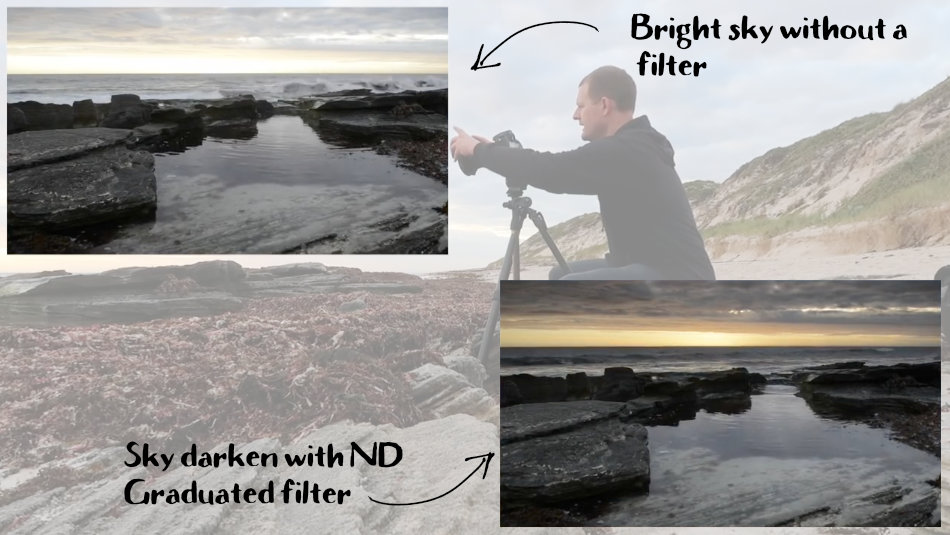
You can use a Neutral Density Graduated filter (ND Grad) to control the light in part of the image. For example, if the sky is brighter than the ground, which is often the case at sunset, you use an ND Grad and position the darker side over the sky to decrease the brightness. The result is that the exposure is more even over the scene.
What are the different types of ND Graduated Filters?
ND Grad filters come in different styles, like soft, hard, and reverse. Each one has a different density applied and is used to reduce light in different situations.
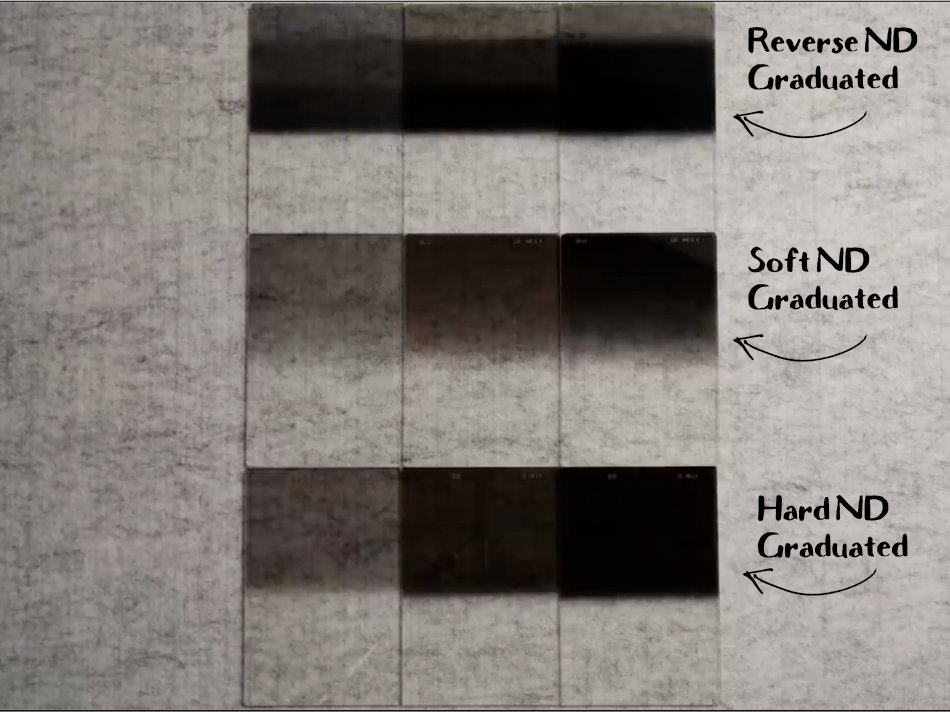
Hard Graduated ND Filters
A Hard Graduated filter graduates from light to dark quite abruptly or quickly. As a result, you get a relatively hard edge between clear and dark sections of the filter, hence the name. You use a Hard Grad ND Filter when the light and dark areas in your scene transition in a relatively straight/flat line, like the horizon over the ocean.
I carry with me 0.3, 0.6, and 0.9 ND Hard Grad filters.
Soft Graduated ND Filters
A Soft Graduated filter has a more gentle graduation over a larger area. There is no distinct line. You use a Soft Grad ND when the edge of the light is uneven, for example, trees or mountains with the sky in the background.
In my filter kit, I have 0.3, 0.6, and 0.9 ND Soft Grad filters.
Reverse Graduated ND Filters
A Soft and Hard Grad ND filter goes from dark to light as you go down the filter. A reverse grad goes the other way, with the darkest part in the middle of the filter (or the bottom of the graduated section) getting lighter the further you go up; see the image above.
A Reverse Grad is helpful when the brightest part of the scene is just above the horizon, and then the sky or clouds get dark the further you go above the horizon.
I’ve added 0.6, 0.9, and 1.2 ND Reverse Grad filters to my filter kit.
Are Filters Necessary for taking Landscape Photos?
Not having filters isn’t going to stop you from taking photos. However, a polarizer is essential if you want the clearest picture with strong, rich colors because you can’t replicate its effect on the image through any software.
You’ll need some ND filters if you want to capture extended, long-exposure photos, particular if there is plenty of light in the scene.
While you can achieve the effect of ND Grads by exposure bracketing your shots, ND Grads allow you to capture the scene in one image.
Aside from a polarizer, the types of filters that you should have in your bag will depend on what type of landscape you most often shoot.
For long-exposure photography, especially in the middle of the day, you’ll need to pack one or two ND filters, so you cut down the amount of light coming into the camera which will let you increase the time the shutter is open (slow down the shutter speed).
For seascapes and desert scenes where the horizons are typically flat, a set of Hard ND Grad filters will allow you to reduce the light in the sky, which is usually brighter.
If you shoot mountains or scenes with rocky which create uneven horizons, the ND Soft Grad filters will be a better option to have as part of your gear. As the filter is more gradual, they are less likely to create a line (sudden light to dark) across your image or have any unwanted dark areas over subjects in the mid or foreground.
Tip
Remember you position these so the darker part of the filter is where ever the light you want to control. If that’s at the bottom of the image, you can turn these around and slide the filters into the holder upside-down.
I like using filters because I enjoy seeing the image on the back of the camera look close to what the final photo will look like.
I live near the coast, so I shoot plenty of seascapes. I use my Hard Grad filters probably twice or three times more than my Soft Grad filters, but I pack both sets just in case.
Alternatives to using ND Grad filters
If you are shooting a scene with a high dynamic range and you don’t have any ND Grad filters, you may be able to capture the scene with a series of exposure bracketed shots. However, this may not be easy if anything is moving in the frame, like water, clouds, or grass/trees blowing in the wind.
Capture one shot of your scene exposed for the highlights and another exposed for the darker areas. In your editing software, merge the two images. You’ll have one image with all the detail in the scene that will be much easier to edit. Adobe Lightroom can do this automatically.
Sometimes the light and dark areas are so complex that you have to bracket the scene anyway. So exposure bracketing is a great skill to learn.
What filters don’t you need for Landscape Photography?
There are other filters like Color filters that block or introduce specific colors across your image and mist/fog filters that enhance or add a fog effect. These filters aren’t necessary as it’s easier to add the effect they have on an image in Post-processing through your editing software.
Ultra Violet (UV) filters were created to protect the film in film cameras, where Ultra Violet light, which can’t be seen by the human eye, can effect the quality of the film in certain circumstances. With digital cameras, UV filters are not needed. I’d advise you to avoid UV filters.
Some photographers still use UV filters as a way to protect the front of their lens, but with the technology they’ve added to the glass nowadays, this is longer necessary. Some camera shops are happy to sell you a UV filter with each lens you buy, but I won’t waste my money.
Screw-on vs Square (Mounted Filters)
Most filters come in screw-on and square or mounted styles. Let’s quickly run through the advantages and disadvantages of each type.
Screw-on
Screw-on filters tend to be cheaper and a little simpler to use because there is no need for a filter holder. However, their drawback is they can be difficult to use in scenarios where controlling the light is complex and requires multiple filters.
Most screw-on filters can be stacked. However, it’s not easy to make adjustments to an individual filter, like a polarizer, when multiple filters are stacked together. You also need to be careful with vignetting when stacking filters.
An advantage of screw-on filters is they are easier to use in wet conditions. You can put the lens cap on until you are ready to shoot, and droplets of water can’t get in between the filters like they can with the square filters placed in a filter holder.
A big disadvantage is if you have lenses with different filter thread sizes, you have to purchase the filters in each size. This will increase the overall price, and you need to remember to bring the corresponding filters for each lens you take with you on a shoot.
The largest issue I have is with screw-on ND Grads filters. The graduation is positioned in the middle of the filter, which is fixed in the middle of your image, which is not usually where you want it. One way of getting around this is taking a wider frame and then cropping your final image in post-production.
I started with screw-on filters but moved to square-mounted filters when I began using ND Grads filters. The trick is to make the switch wen you’ve decided you want to get more serious about your photography, but before you get too invested in screw-on filters.
Square Filters (Mounted Filters)
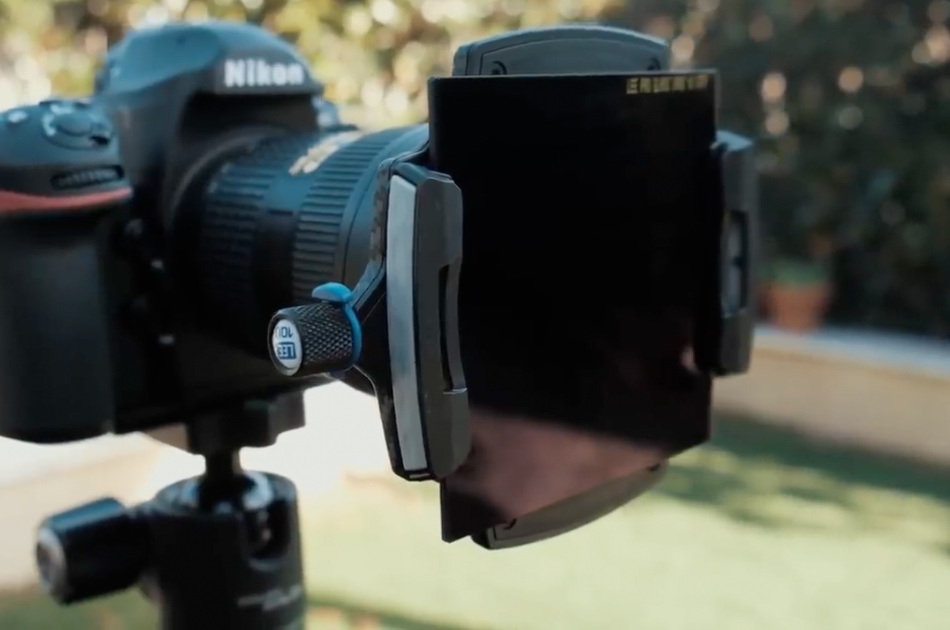
Square filters that mount to a lens via a filter holder can look a little daunting to newcomers. However, I prefer to use this style of filter for my landscape photography.

NiSi V7 Filter Holder Kit with True Color CPL
This Circular polarizer is integrated into the filter holder. The filter is mounted in front so the polarizer can be rotated independently while mounted to the lens.
The initial investment is a little more because you need a filter holder that mounts to your lens to fit the filters.
The filter holder mounts to lenses with different thread sizes using adapter rings. This means the filter holder and any filters you have can be used on any lens you have in your bag so long as you’ve got the right adapter ring.
When you need to stack square filters, you can easily position each filter at different heights to suit the scene and the light conditions.
One thing to look out for is you want to be able to rotate the polarizer independently of the filter and also make adjustments to the polarizer without having to remove the other filters.
Organizing and Storing your Filters
The way you pack your filters is important. Both glass and resin filters are delicate, so you need to store them, so they are protected from breaking if they a knocked in your bag or a weight is put on them.
You should be able to access your filters quickly. You’ll also find you need to identify the correct filter in light that is not also ideal.
The solution is a pouch that provides protection and allows for easy access.

NiSi Filter Pouch
The Caddy 100mm Filter Pouch holds 9 Filters, 4 x 100x100mm and 5 x 100x150mm. This is ideal for both ND filters and ND Grad filters.
This is the pouch I use, and one of its best features is it can be fixed to the camera and tripod when setup, so I don’t have to be going back to my camera bag when changing filters. They hang conveniently around the tripod allowing my hands to be free to make adjustments to the camera settings and the tripod.
Filter Quality – What to look out for
There are many different makes of filters on the market.
I’ve used a few different types, some are cheaper than others, and typically, I’ve found you get what you pay for.
I used LEE Filters for eight years and then moved over to NiSi Filters. I’ve found both brands excellent and generally better quality than other filter brands
The sorts of things you need to watch out for are:
- Color casting – where a slight color like blue or magenta is added to your image.
- Fading – the Neutral Density can get light over time. This is due to the way the tint is applied and the material the filter is made from.
- Some surfaces on the filters are softer than others, so they are more likely to scratch, particularly when used around dirt and sand.

NiSi V7 Advanced Kit
The NiSi 100mm V7 Advance Kit comes with Filter Holder and CPL plus 2 ND Filters and 2 ND Grad Filters for Long-Exposure and Landscape Photography.
What Filters would I Recommend for Landscape Photography?
I’ve been asked plenty of times for my recommendation for filters, and the best advice I can provide if consider the style of images you want to create and the types of landscapes you like the shoot.
Plus where you are on your photography journey – but here’s some general advice.
If you haven’t already, get yourself a polarizer.
If you are just starting, are on a budget or you’re still working out whether you enjoy shooting landscapes, just get yourself a screw-on polariser and make sure it’s a circular polariser so you can adjust the amount of polarising effect.
If you are into Landscape Photography and want to begin investing in a square filter mount system, start small. Work out what type of landscapes you typically shoot.
I suggest picking up the 0.6 ND Grad in both Soft and Hard, then add a 0.3 ND Grad.
If long-exposures are your thing, look at investing in Neutral Density filters, starting with the 6-stop ND filter.
Depending on where you go with your photography, you can add to it over time.
I took me a few years to build up the system I’m currently using.
QUICK RECAP
Photographers use a range of filters to control and adjust the light coming into the camera. For example, polarizer filters reduce glare and unwanted reflections. Graduated filters can help reduce light in bright areas, so the brightness is more even across the scene. Neutral Density filters reduce the light of the whole image so that you can take photos with longer exposures.
A polarizer can also cut through haze which is caused by light being scattered by the moisture and particles in the air, resulting in better contrast and detail.
You often get what you pay for (color cast and easily scratched)