When you’re on location capturing the perfect shot of the stunning landscape, there’s plenty to think about. None is no more important than how you will expose the picture you’re taking to make sure you nail that image. So how do you get the correct exposure for a landscape photo?
For the best exposure for your landscape image, set the ISO to 100, the base ISO of the camera. Exposure is controlled with the Aperture, set to f/11 to f/16, and the Shutter Speed, set between 1/100 to 1/4 of a second. Use the Live Histogram to monitor the exposure, ensuring the Histogram is as far to the right, without touching the right-hand side.
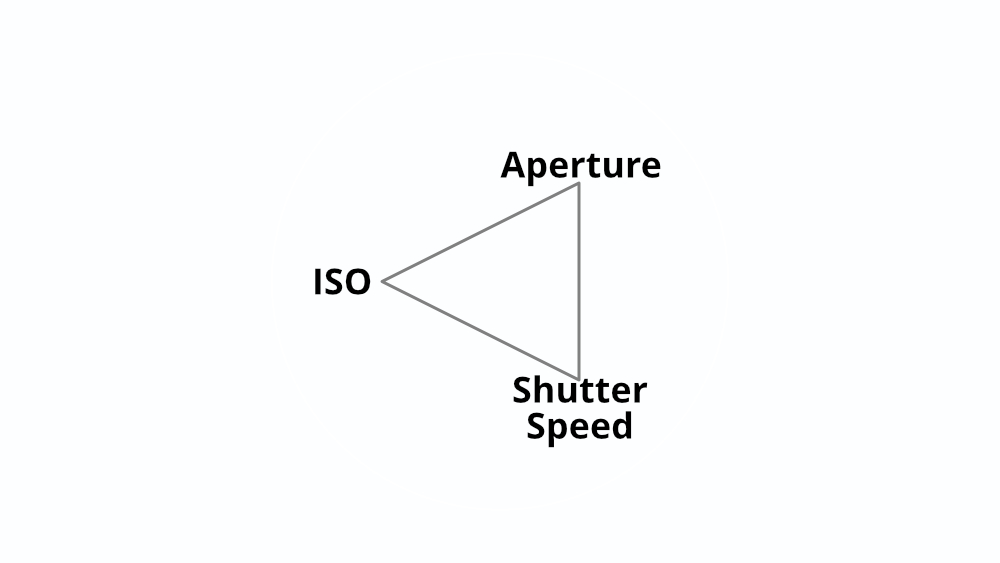
What Controls the Exposure of a Photo? – The Exposure Triangle
Three controls impact the exposure of an image, ISO, Aperture, and Shutter Speed. Traditionally known as the Exposure Triangle.
While the Exposure Triangle reminds us that there are three controls for Exposing a photo, there is a better way to think of exposure.
What is The Exposure Pie?
Thinking of Exposure more as a pie or pizza helps you work out how each of the controls works together. There are still three controls, ISO, Aperture, and Shutter Speed; however, they are represented as pieces that make up a pie.
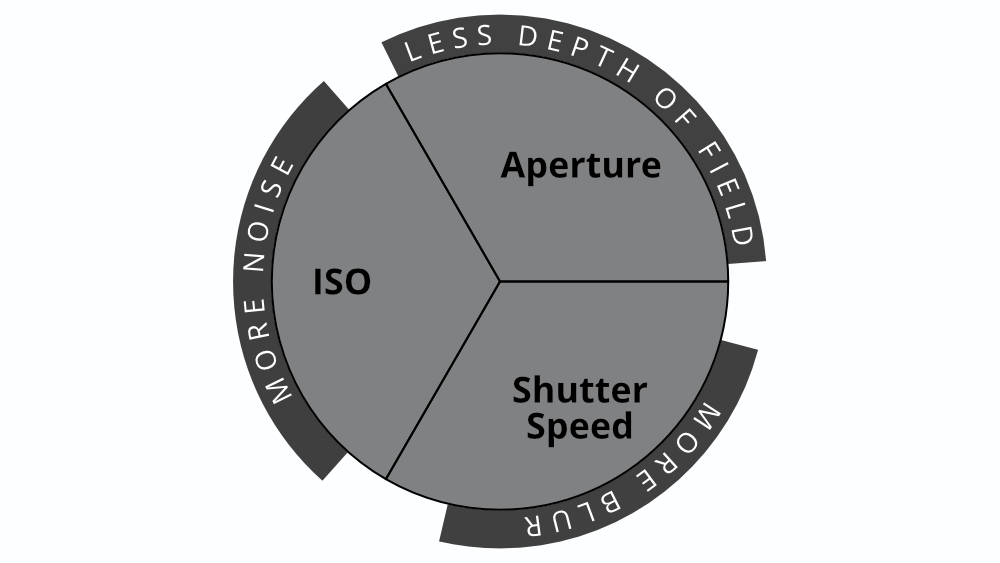
A whole (entire) pie represents the correct exposure for an image. The size of each piece roughly depicts the amount of light allowed in from each control. The Exposure Pie shows that are you decrease the amount of light from one factor, the amount of light needs to be made up from another control of exposure.
Monitoring the exposure of an image
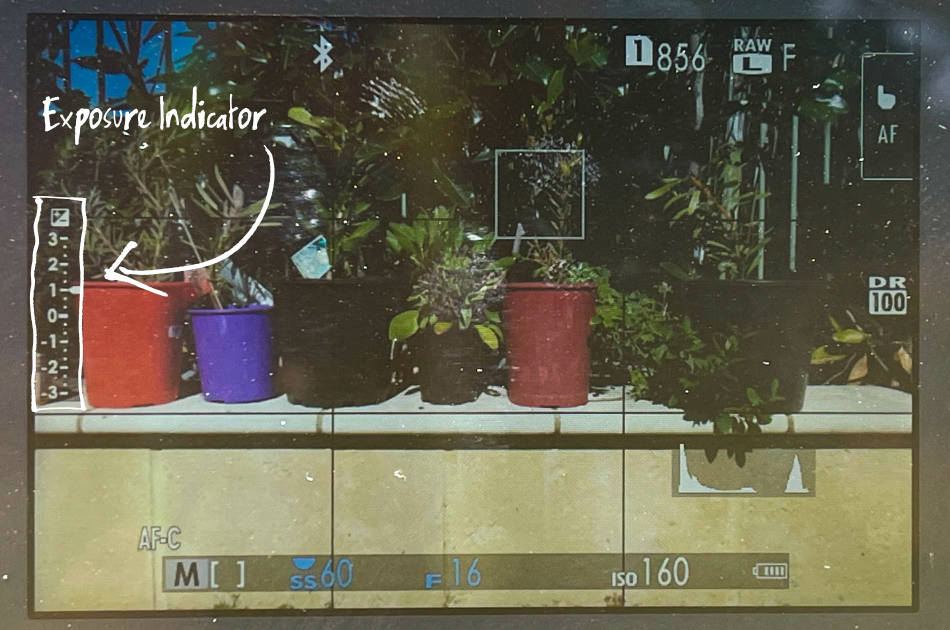
Most modern cameras provide several ways to work out the exposure of a photo, including the Exposure Indicator, Live View Histogram, and RGB Histogram.
What is the Exposure Indicator?
The Exposure Indicator, a scale from -5 to +5, is standard for many cameras to present the Exposure Value. How your camera determines the Exposure Value will depend on which Metering Mode you’ve selected.
Matrix metering mode (Nikon), Evaluative metering mode (Canon), Multi metering mode (Sony/Fujifilm)
Measures the light of separate zones across the shot area and provides an average giving preference to where you’ve focused the camera.
Center-Weighted Average metering mode (Nikon/Canon/Sony/Fujifilm)
Averages the light measurement across the shot area, preferencing the center area of the scene in the final calculation.
Spot metering mode (Nikon/Canon/Sony/Fujifilm)
Measures the center area of the scene only, disregarding the rest of the frame. Canon also has Partial metering mode, which is similar to Spot but measures a slightly larger center portion of the frame.
By default, spot metering measures about 2% in the middle of the frame. However, some cameras allow you to link the spot metering to the AF point where the camera is focused.
Average metering mode (Fujifilm)
Giving equal weighting across the frame provides a value that is the average of the measurements taken across the entire scene. It can sometimes get confused in locations with challenging lighting conditions, where Multi metering mode is more suitable.
Sources:
Fujifilm, Canon, Nikon, Sony
What is the Best Metering Mode for Landscape Photography?
For Landscape Photography, correct exposure of the entire scene is essential. So set the metering mode to Matrix mode (Nikon), Multi metering mode (Sony). Which takes measurements of light across zones in the frame and provides an average for the entire image.
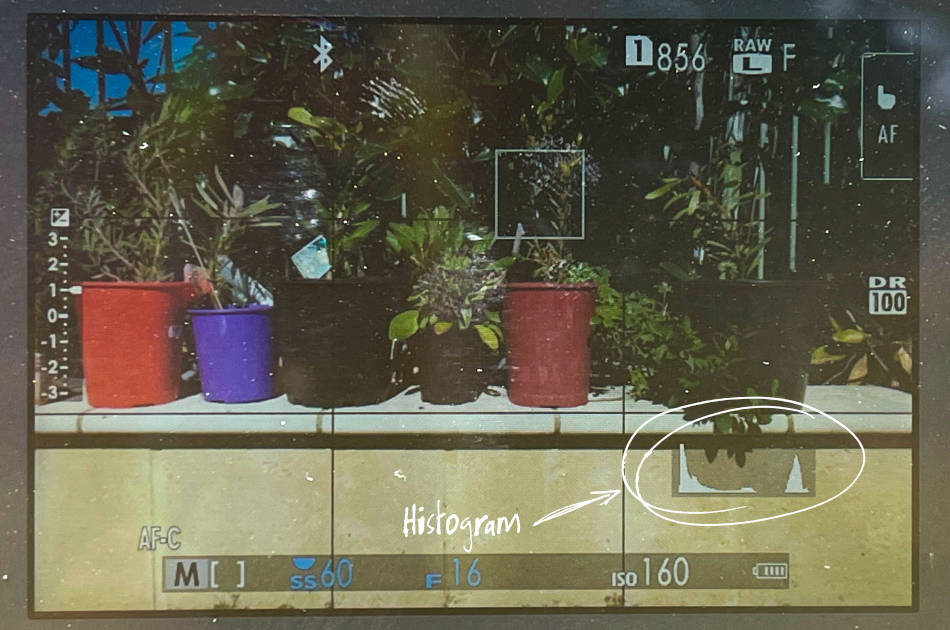
The Best Method to Monitor the Exposure for Landscape Photography | Using the Live Histogram
While there are plenty of options for Metering Mode, there are two essential issues in my experience. Swapping between modes can be cumbersome, even if you’ve set up a custom button to allow you to switch between modes easily. Plus, you rely on the camera to determine the exposure, which will work for most cases but not all.
The best way to work out the correct exposure for a Landscape photo is to use the Histogram in Live View. The Histogram presents a graph or chart of the tonal values (all the tones from dark to light). Utilizing the Histogram, you can determine how much of the image will be under-exposed and over-exposed.
Most modern cameras allow you to display the camera’s Histogram on the back LCD screen when you have the camera in Live View. The Histogram may not be shown by default, so you may have to go into your camera settings.
How to Display Live Histogram on Nikon mirrorless cameras
- When viewing the LCD screen
- Press the DISP button several times
- Toggle through the Display modes until Histogram shows
How to Display Live Histogram on Nikon DSLR cameras
- Go into Live View
- Press the “i” button
- Navigate the EXPOSURE PREVIEW and toggle it ON
- Now press the ‘info’ button several times
- Toggle through the Display modes until Histogram shows
How to Display Live Histogram on Fujifilm cameras
- Open the Settings Menu
- Goto SET UP, then SCREEN SET-UP
- Navigate to DISP. CUSTOM SETTING
- Make sure that the HISTOGRAM box is ticked
How to Display Live Histogram on Sony camera
- When viewing the LCD screen
- Press the DISP button at the top of the wheel several times
- Toggle through the Display screen until the Histogram shows
How to Display Live Histogram on Canon cameras
- Open the Settings Menu
- Goto SET UP, then SHOOTING INFO. DISP.
- Go into SCREEN INFO. SETTINGS
- Open INFO EDIT SCREEN and
- Make sure the HISTOGRAM is selected
PRO TIP – Most cameras can be configured to flash red over the image when you view it on the LCD screen or through the EVF when there are over-exposed areas. Just displaying the Histogram is enough for most scenarios.
How to Use the Histogram for Exposure in Landscape Photography?
You have your Histogram set up in Live View so you can monitor the exposure before you take a shot. You want the landscape image you take to be as bright as possible without overexposing the highlights or the brightest parts of the scene. So how do you use the Histogram to get the proper exposure for your landscape photo?
While monitoring the Histogram, adjust your camera’s exposure using ISO, Aperture, and Shutter Speed, so the Histogram is as far to the right as possible without touching the right-hand side. This ensures the image you capture is as bright as possible while not overexposing the brightest parts of the picture.
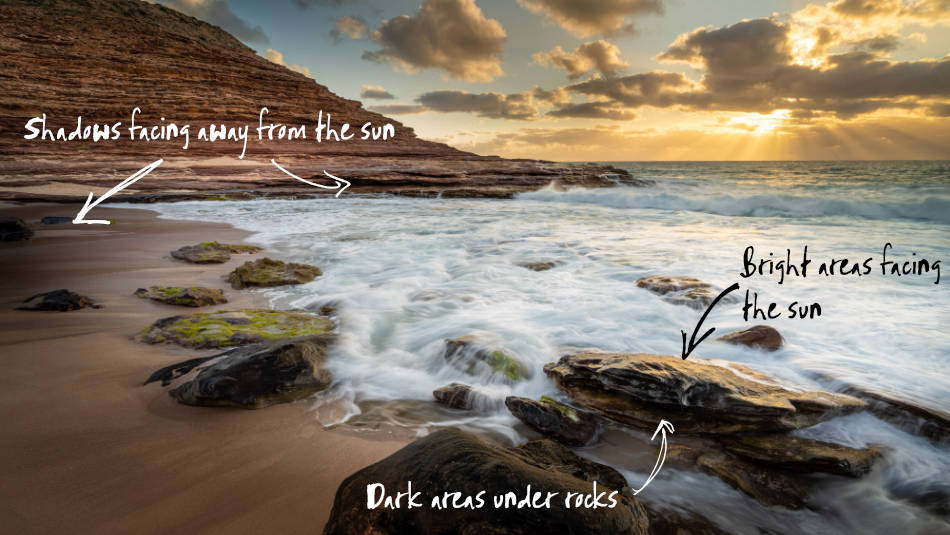
When we are shooting landscape images, we are relying on natural sunlight to light up the scene. Now we know of the beauty that can create across our landscape, but it can have its challenges. One challenge we’re often dealing with is uneven light as the sunlight is coming from a single source, the sun.
Many landscape scenes have dark areas like shadows, spaces under rocks, or just the sides of objects facing away from the sun. Some locations can seem dark because other portions of the scene are pretty bright in comparison. One of the technical challenges landscape photographers face is how to capture these dark areas with plenty of detail.
You may be thinking that most of the work to get detail out of the shadows can be done in Post-Processing. Sure, you can bring up the exposure or the shadows using your favorite editing software. However, suppose an area is too dark. In that case, you’ll find as you increase the exposure through the editing program, that area will have noise and lack any detail. This could be distracting in the final image.
What to Expose for when taking a Landscape Shot?
To make sure the darker portions of an image have as much detail as possible, we need to capture as much light as possible from those darker areas. To do this, we need to select an exposure so we take the brightest image we can.
How Bright should my Landscape Image be?
When taking a landscape shot, the image should be as bright as possible to ensure details in the darker areas are captured. However, not over-exposed to the extent that highlights in the picture are blown out. The Histogram should be as close to the right without touching the right-hand side.
What is Exposing to the Right (ETTR) in Landscape Photography?
Use the ETTR technique to work out the exposure for the brightest image possible without blowing out the highlights. Adjust the camera’s exposure shifting the Histogram to the right, so it’s touching or nearly touching the right-hand side. Then reduce the exposure 1/3 or 2/3 of a stop to ensure the brightest areas of the photo are not over-exposed and still have detail.
What to do if the scene has a Larger Dynamic Range than the camera can Handle?
You might be trying to capture a location that has very dark shadows and very bright highlights. The Dynamic Range of the scene, the tonal difference between the darkest part and the brightest part of the image, might be larger than the camera’s Dynamic Range. This will be evident on the Histogram, with parts touching both the left and right sides. You won’t be able to capture all of the tones in one shot.
There are two options. Use a filter to reduce the amount of light coming from the brightest part of the image, so you can increase the exposure across the entire photo without clipping the highlights.
Alternatively, bracket your image, where you take separate shots, each exposed for a different part of your image. Then merge the correctly exposed portions of each photograph taken to create the final image.