It can be frustrating to view your images after a photography trip to discover a lot of the shots you took seem blurry and not as sharp as you were expecting.
Why are my landscape photos blurry?
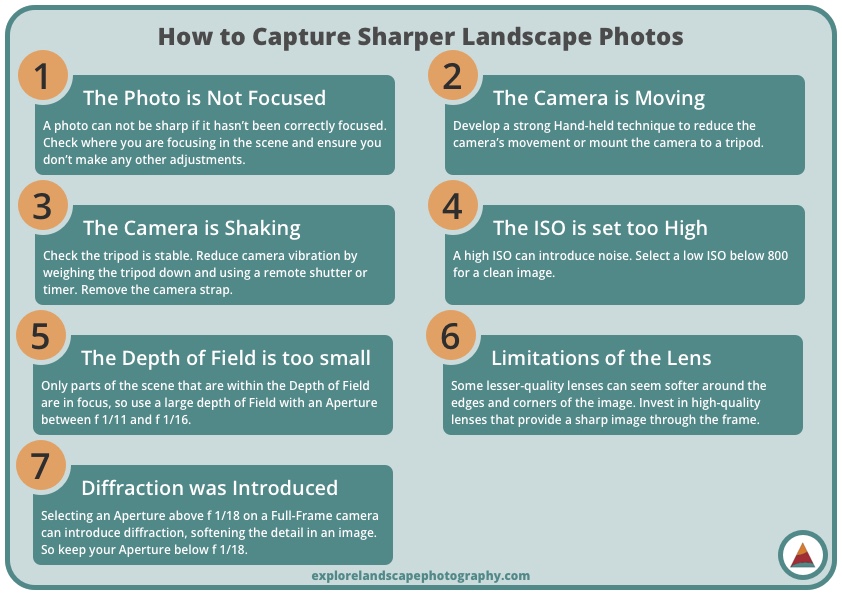
A landscape photo will look blurry if the scene hasn’t focused correctly or if the camera moves or shakes even slightly as the shot is taken. A high ISO or a small Depth of Field can also cause an image to look blurred. Limitations in the lens or lens diffraction can also impact the sharpness of a picture.
It can be one of these things or a combination of factors causing your landscape pictures to look soft.
Landscape images are more pleasing to the eye when every element in the frame is crisp and tack-sharp.
Objects with sharp lines and textures engage the viewer as they explore the detail captured in the image.
A landscape photo that has blurry detail or is soft in areas can be distracting and lower the image’s quality.
What causes my landscape images to be blurry?
Let’s go through each of the possible causes and explore what we can do to fix each of them so we capture stunningly sharp landscape photos.
1. The Photo is Not Correctly Focused
For you to have any chance of having a sharp image, the scene must be in focus.
This may be stating the obvious, but this is a common cause of a photo with soft detail.
Whether you use autofocus and the camera miss calculates the focus or manual focus, and you are slightly off the optimal focus, it won’t be sharp if an image hasn’t been focused correctly.
While you can’t fix an image that has been taken out of focus, you ensure an image is in focus before you capture your photo.
Focusing the camera should be to last thing you do before taking a shot.
Once you’ve set up your composition, the correct exposure settings have been dialed in, and any required filters have been applied, you can focus the camera.
Once the camera is focused, you shouldn’t make any other adjustments as it may impact the camera’s focus and result in an image that’s out of focus.
You can have an image that has been focused correctly but isn’t sharp.
So what’s the difference?
What’s the Difference Between Focus and Sharpness?
What is sharpness in photography?
The Sharpness is the level of detail in the photo and is impacted by the resolution of the image. In turn, the resolution of an image comes down to the number of pixels on the sensor.
…for a photo to be sharp, it must initially be in focus.
What is focus in photography?
Focus is achieved when the maximum amount of sharpness (resolution) and contrast has been attained for an image through adjustments made to the camera or lens.
These may sound similar, but the difference is while a photo has to be in focus for it to be sharp, a focused image may not necessarily be sharp for the reasons explained below.
The takeaway is for a photo to be sharp, it must initially be in focus.
The rest of the causes mentioned below will only make a difference if the image is correctly focused, to begin with.
2. The Camera is Moving as the Shot is Taken
If the camera moves as the shot is taken, the image will be blurry.
This can happen when you capture shots while holding the camera instead of being mounted to a tripod.
You can do some things to mitigate the problem if this is the cause.
Develop a Proper Hand-held Technique
Develop a strong technique when hand-holding the camera. Effectively you are replacing the tripod, so you need to be as stable as possible so the camera is still. If you can, bend your knees slightly to lower your center of gravity and cushion any slight movements.
With your right hand holding the camera and your left hand cradling the lens from underneath, have the camera in contact with your eyebrow as you look through the EVF.
This technique creates three contact points between you and the camera, increasing stability.
Make sure you minimize any movements as best you can.
Dial in your settings, line your shot up, and slowly breathe out before taking the picture at the end of your breath.
Instead of pressing down on the shutter button, squeeze gently to avoid any unnecessary movements.
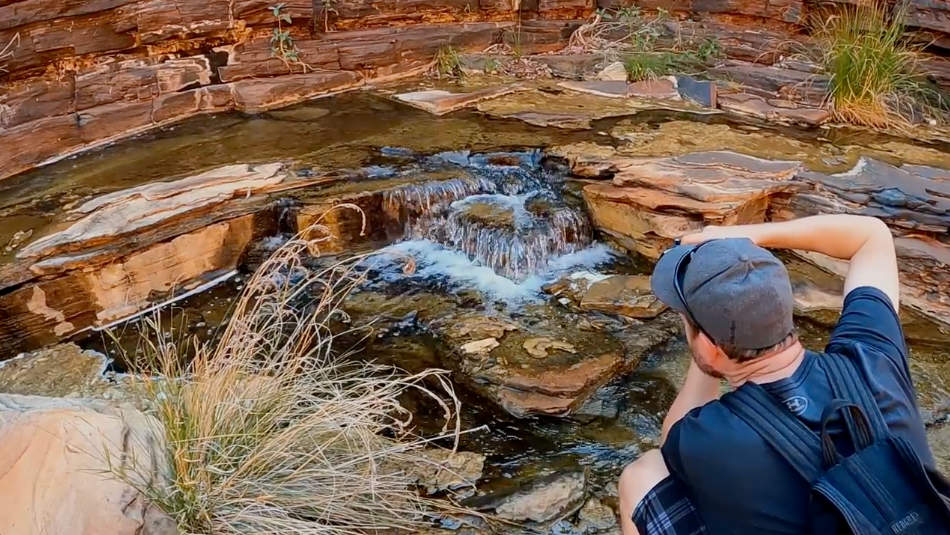
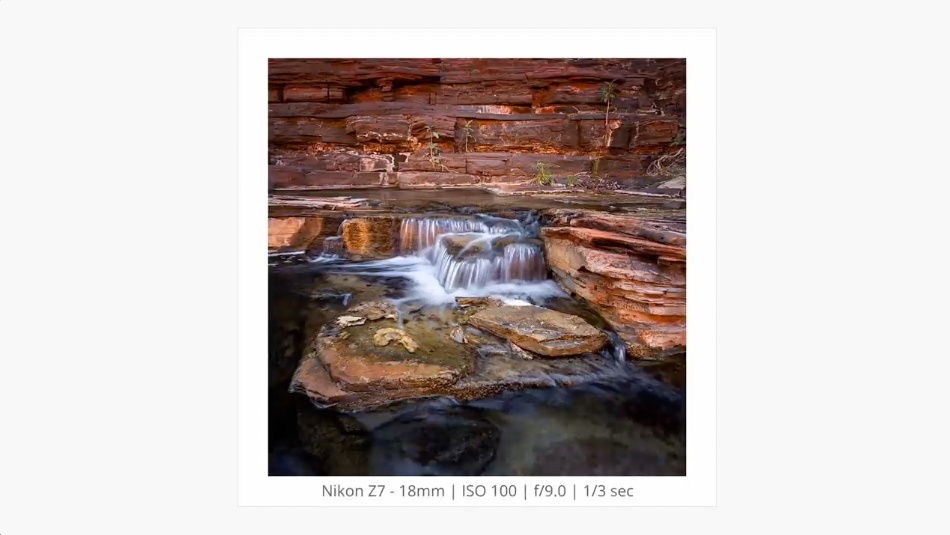
In this video, I take my camera down a gorge in Karijini National Park and capture each image hand-holding the camera.
Use a Faster Shutter Speed
The slower your shutter speed is, the longer the shutter is open to capture the photo, and the more likely camera will move as you take the shot.
Therefore an easy way to minimize the camera moving as the shot is taken is to select a quicker shutter speed.
With the proper technique, you should be able to take a sharp image with a shutter speed quicker than 1/100 of a second.
As a general rule, you can quickly work out a suitable shutter speed by inverting the focal length you are using.
For example, with the lens at 24mm, you should be right using a shutter speed of 1/24 sec or quicker. However, if your shot has a focal length of 200mm, use a shutter speed equal to or quicker than 1/200 sec.
Remember, if you change the speed of the shutter, you’ll need to adjust the ISO or Aperture to maintain the correct exposure for the scene.
If you can stabilize the image, you can successfully shoot sharp images with slower shutter speeds.
Turn on Image Stabilization
Many modern cameras and lenses have technologies that assist with stabilizing an image, allowing you to use longer shutter speeds when capturing a photo as you hold the camera in your hands.
Some cameras have In Body Image Stabilization (IBIS), where the image is stabilized through software or mechanically using a mechanism to move the sensor to counteract small movements in the camera.

Some lenses also have Image Optimisation Systems (IOS) that have a similar effect on minimizing the impact of small shifts in the camera.
I recommend turning on IBIS on your camera or IOS on your lens if they have the feature, as it can increase the sharpness of the photos you capture while you hold the camera in your hands.
Image stabilization is often measured in stops. While you should always test the effectiveness of the stabilization out for yourself under the conditions you shoot, stabilization of 5 stops will theoretically allow you to adjust the shutter speed 5 stops and still take sharp images.
Some camera systems can work simultaneously with both IBIS and IOS turned on, providing significant benefits.
Mount the camera to a tripod
Fundamental to this cause is the camera is moving as to take a shot.
This can be negated by simply mounting the camera to a tripod.
A tripod isn’t always continent to use, but if it can be, it is the most effective way to ensure your camera is stable and isn’t moving when you capture a shot.
3. The Camera is Shaking While on a Tripod
Even if your camera is mounted to a tripod, it can still move slightly as you take photos.
With the incredible size of sensor pixels, anything that shifts the camera even a fraction of a millimeter could result in degraded sharpness in your image.
Ensure the Tripod is Stable
Just because you are using a tripod doesn’t guarantee the camera won’t shake. You need to ensure the tripod itself is stable.
- Check the tripod legs are fixed in place.
- Ensure the ball head is tightened.
- Look where the tripod’s feet are in contact with the ground.
Assess whether the tripod has a sound footing. Rubber feet may be better for slippery surfaces. On some tripods, you can replace the rubber feet with spikes more suitable for softer surfaces.
When I’m shooting at the beach, and the tripod is positioned on the sand, the tripod can move as the sand is not firm. The best way to deal with this is to push the tripod’s legs into the sand carefully. This is particularly effective when I have waves pushing water up against the legs of the tripod.
Weight Down the Tripod
If you are shooting in windy conditions, this may cause the tripod to shake slightly.
The lighter your camera and tripod setup is, the more likely the camera will move in the wind.
One effective way to address this is to hang a weight, like your camera bag, off the center hook found on most tripods.
Use a Remote Shutter
Even the slightest movement can impact the sharpness of a photo.
When you press the shutter button to take a picture, you may inadvertently vibrate the camera.
You can easily get around this by using a remote shutter.
Wireless shutter remotes are available for most cameras, like the one below.

Pixel Wireless Remote Shutter Release
A wireless solution to remotely trigger the shutter avoids any camera shake risk. Available for all makes and models of cameras.
Alternatively, you can get a wired shutter remote, which runs on the camera’s battery and is less hassle and cheap enough that you could pick up a second as a spare.

Pixel Remote Shutter Release Cable
An inexpensive remote shutter cable that is reliable and doesn’t require messing around with wireless connections. Available for all makes and models of cameras.
Delay the Shot with a Timer
Another way to take a picture and avoid shaking the camera while the shot is taken is to set up a timer.
Using a timer of two seconds or more gives enough time for the camera to stop vibrating because you press the shutter so it’s completely still when the shot is captured.
The only downside to this approach is that it can be challenging when a photo’s timing is crucial, for example, when trying to capture the exact moment a wave crushes over some rocks.
Remove the Camera Strap
Anything attached to the camera, like a camera strap that can be caught in clothing, knocked by a hand, or flapped around by the wind, should be removed.
Camera straps or smaller hand straps are unnecessary if you are predominantly shooting with your camera mounted to a tripod.
If you occasionally shoot hand-held, consider using a strap system like the one from Peak Design that allows you to quickly attached and remove the strap.

Peak Design Camera Strap
Comfortable, well designed and easy to adjust the size. The Peak Design anchor links allow for quick release of the camera strap.
4. The ISO is set too high
Using a high ISO can make your shots seem soft and lack sharpness.
ISO on a digital camera is often referred to as the sensitivity of the camera’s sensor, but it can be thought of as gain.
Similar to how an Amplifier increases the strength of the sound, your camera can increase the strength of the light hitting the sensor.
Like an Amplifier, your camera can introduce noise through this artificial process.
The cleanest reading you can get from your sensor is when the camera is set to its native ISO, which in most cases is ISO 100, but it depends on the camera.
The native ISO for the following cameras are:
- Sony A7R – 100
- Canon R5 – 100
- Nikon D850 – 64
- Nikon Z6ii – 100
- Nikon Z7ii – 64
- Fujifilm GFX100S – 100
- Fujifilm X-T5 – 125
For landscape photography, it is best to have the ISO set to the native ISO of the camera so you can capture the cleanest image with a minimum amount of noise.
Sometimes it is necessary to increase your ISO to achieve the correct exposure.
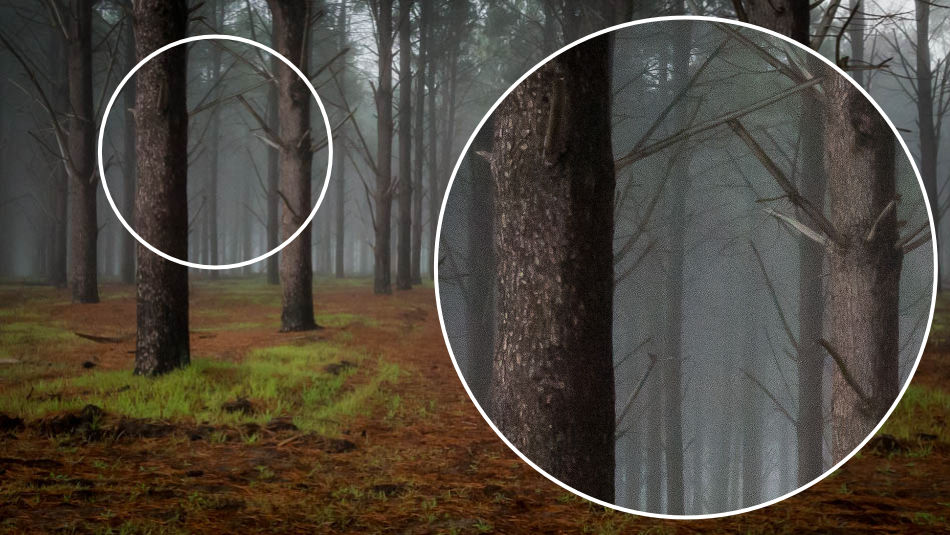
ISO of 400 or even 800 is acceptable on most cameras, but much higher than that, you risk introducing too much noise, making your photos look like they lack detail and sharpness.
5. The Depth of Field is too small
Depth of Field (DoF) refers to the region as you move away from the camera that is in focus.
So assuming you have your image focused at a point in the scene, the DoF is how much of the scene, in front and behind that point, that’s also in focus.
A wide Aperture around f 1/2 or f 1/4 creates a small DoF. Only the portion of the scene within the small DoF will be in focus.
You can achieve a larger DoF with a narrower Aperture around f 1/11 or f 1/16, so a greater part of the scene will be included in the DoF; hence more of the scene is in focus.
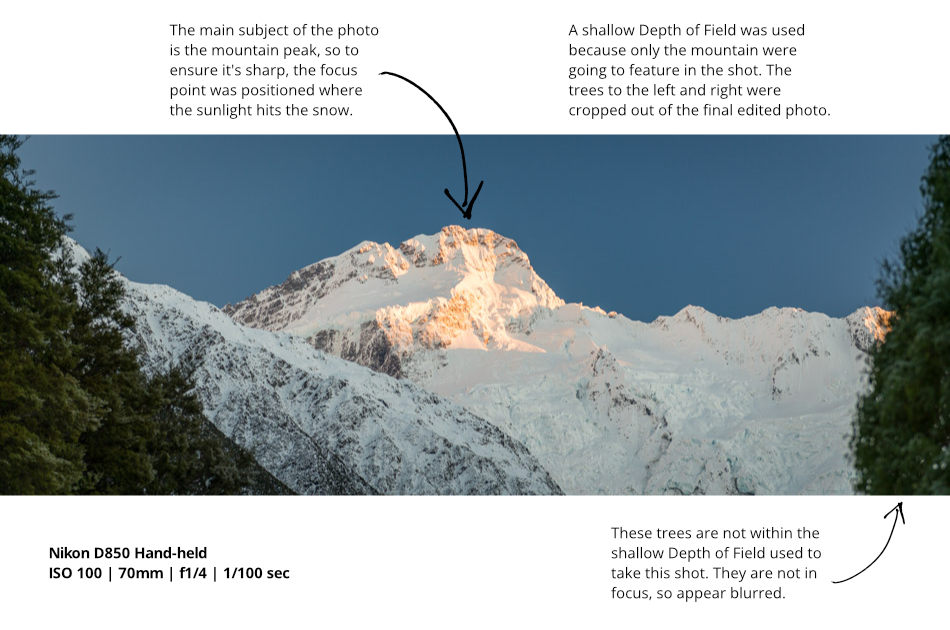
In this example, I focused the camera on the mountain peak of Mt Cook and used an Aperture of f 1/5.6.
While the mountain is focused, the trees on the right are out of focus and look blurred. The DoF should have been larger to include the trees to the right as they were closer to the camera.
6. Limitations of the Lens
Not all lenses are the same quality. For example, some older lenses are less sharp than some of the newer lenses available today.
More expensive lenses tend to be better quality and are generally sharper.
As camera technologies improve and the resolution of sensors increases, some older lenses can only resolve an image to a lower resolution than the sensor.
After Nikon came out with the D850 with the 40Mp sensor, they released a list of the lenses they recommended using due to the ability of the lens to produce an image at a high enough quality to match the resolution of the sensor.
While some lenses are sharper in parts of the image, like the center, the image can be softer, close to the edges or corners of the frame.
Lenses that produce a softer image should be disregarded as they can add character to your photos.
However, if you are endeavoring to create landscape images that are sharp right through the scene, consider investing in higher-quality lenses.
7. Diffraction was introduced
Diffraction is one limitation all lenses have, no matter what the quality.
Diffraction is a physical property of light and occurs as light passes through a tiny opening.
As the light passes through a tiny opening, it spreads slightly, causing the image to be less sharp, particularly around edges and fine textures.
The smaller you have the Aperture, the more likely diffraction is introduced.
So to avoid diffraction in your photo, limit the Aperture to no smaller than f 1/16, in some cases, f 1/18. Any narrower, and your image can start to look softer and lack detail.
Can I Fix a Blurred Image in Post-Production?
You can increase the sharpness of any image in editing software like Lightroom or Photoshop.
However, be careful, as the software can’t distinguish between detail and noise. So as you increase the sharpness, the detail and noise can be enhanced and become more prominent in the image to the point where artifacts are introduced.
This is why capturing the cleanest image with as little noise as possible is better, so it’s easier to edit in post-production.
A Word of Warning about Sharpness
Sharpness is important in a landscape photo, as a sharp picture is more pleasing to the eye and captures the viewer’s interest.
However, you don’t want to become infatuated by how sharp your image is to the detriment of the rest of the shot. Many other parts of a picture make a landscape photo engaging to view.
More than a sharp image is needed to make it a quality landscape picture.
QUICK RECAP
If you are finding that the landscape photos you capture seem blurred and lack sharpness, ensure the camera is as still as possible as the shot is taken.
Develop and good technique to hand-hold the camera or mount it to a tripod.
Ensure the tripod is as stable as possible and minimize the possibility of introducing any camera shake by weighing down the tripod, using a remote shutter, and a quick shutter speed.
Use an ISO as close to the native ISO of the camera, an Aperture between f 1/11 and f 1/18 to provide a sufficient Depth of Field, and a high-quality lens.