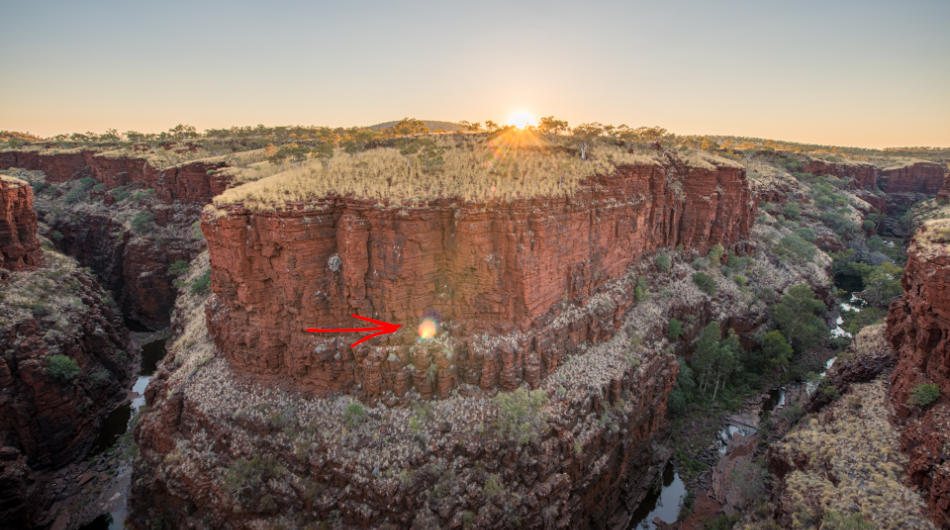
I recently returned from a landscape photography trip and noticed colored dots or marks in some images. These marks are artifacts created by lens flare.
So we will cover what lens flare is, what causes it, and what you can do to handle these colored marks in your image.
Lens Flare occurs when there is a bright light source in the frame, resulting in color circles, streaks, or spots in the image. The glass elements in the lens refract the light, creating the colors. As the light reflected between the glass components, there can be multiple spots in the photo.
Here are 4 ways to reduce, remove or avoid lens flare in your photos.
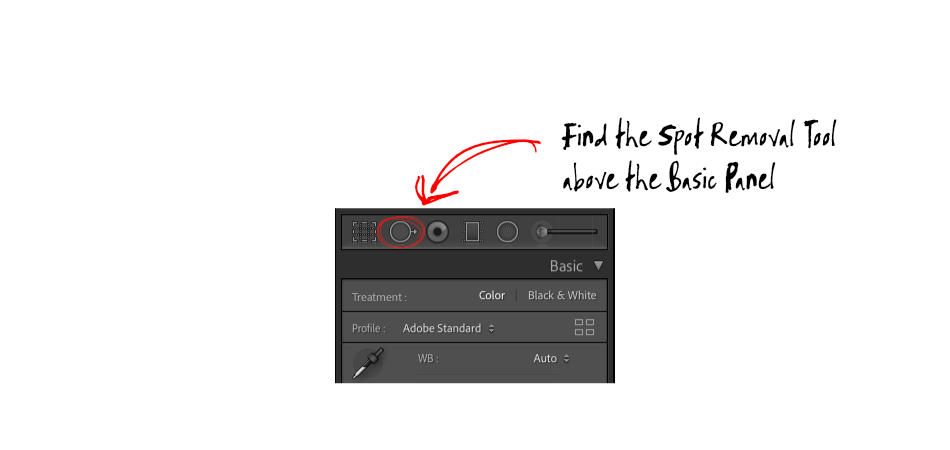
1. Use Spot removal tool in Lightroom
When you find a colored mark in your image caused by a lens flare, one option to try and remove it is to use the Spot Removal tool in Lightroom.
Open your image in Lightroom and click on the Spot Removal tool found above the base adjustment panel.
Change the target size by scrolling the mouse wheel up and down or using the square brackets on the keyboard. You want to make the area slightly larger than the spot you are trying to remove.
Place the tool over the mark you want to remove and click the left mouse button.
Lightroom will automatically determine the best part of the image to sample and will then replace the area you targetted with that sample.
You and click and drag the sample component of the tool with the left mouse button to manually choose a different part of the image.
PRO TIP – Adjust the feathering of the tool to change how smooth the merge is around the edges of the targetted area.
If the mark is an odd shape, paint over the area with the left mouse button pressed to cover the mark.
This technique is a good option for small marks on the backgrounds that aren’t consistent nor too busy. If you can see artifacts left by the tool, try increasing the tool size or changing the feathering.
If this option isn’t successful, revert the changes and open the image in Photoshop to try the Content Replace tool.
2. Content Replace in PhotoShop
When you have bigger lens flare marks, or it’s impossible to deal with them with the Removal Tool, you can try similar tools in Photoshop.
Clone Tool
You can use the Clone Tool to manually sample a part of the image to replace the flare mark. It works similarly to the Removal Tool in Lightroom, but instead of selecting the spot you want to remove, you first pick the sample area that will replace it.
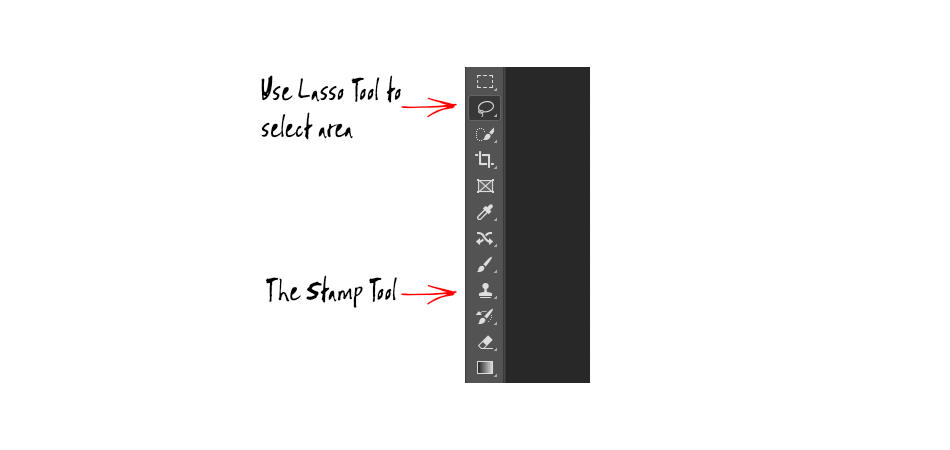
Content-Aware
The second option in Photoshop is the Content-Aware feature.
You first select the area you want to remove by using the Lasso Tool and drawing around the mark.
Once selected, you should see the marching ants around the edge of the selected area. Then just hit the ‘Delete’ key on the keyboard.
The “Fill” dialogue box will pop up, providing a few options. Choose “Content-Aware” from the Content menu, and click ‘OK’.
The software uses an algorithm to work out how best to fill the deleted area utilizing the rest of the image for context.
3. Shoot away from the sun
Options one and two mentioned above are helpful with you have already taken the shot and notice the lens flare when you look at the image on your computer. However, there are some techniques you can try when you are on location capturing your photo.
Lens Flare occurs when there is a bright light source in front of the camera. When capturing landscape photos, this light source is likely going to be the sun.
So when you shoot towards the sun you can expect to see the color marks caused by lens flare.
An easy way to avoid this issue is to shoot away from the sun.
I tend to shoot most of my landscape photos with the sun at a 90-degree angle from the direction I’ve pointed the camera, so I don’t encounter this issue.
Another advantage to this approach is I capture the effect of the sun side lighting the elements in the landscape, which provide interest and depth to the scene.
When the camera aimed towards the sun for a sunset, I’ll often wait for the sun to set before I capture my landscape photos.
4. Recompose your shot s the flare lines up with the sun
Sometimes shooting towards the sun is unavoidable, and waiting for the sun to disappear below the horizontal is not practical.
On these occasions, there are a few things you can try.
The effect of lens flare is more pronounced when the sun is at a slight angle. The close the sun of to the center of your image, the fewer artifacts there will be.
Consider reworking your composition, so the flare lines up with the sun. Any mark from the refracted light will be positioned over the sun and therefore disappear as the bright light from the sun will blow out the color spot.
A similar approach is to adjust the composition to move the mark to an area in the image that makes it easier to remove using option 1 or 2 mentioned above.
5. Utilize your Lens Hood
Lens hoods can be useful when shooting in several challenging conditions. For example, they can protect the front of the lens from light rain, sea spray at the beach, or water mist from a waterfall.
You can also use the hood of a lens to block the sunlight shining directly on the front of the lens.
Mounting just the hood on the lens may be effective if the sun is to the side.
If the sun is more directly in front, you may need to extend the hood or place your hand there to obstruct the light. However, be careful not to intrude into the frame.
6. Use your thumb to block the light
When you want the sun to appear in the image, you cannot block the sun out without encroaching into the image.
If you notice some lens flare in the shot you want to remove, you can try the Thumb technique.
Set up your camera for your composition and dialing in your exposure settings as usual.
Press the shutter to take the shot and check the image on the back to make sure you’re happy with the photo.
Now place your thumb or finger over the sun to block it out of the image, removing the lens flare marks. Take a second image.
PRO TIP – It’s usually easier to bring your finger or thumb in from the edge of the frame that the sun is closest to, so you decrease the area of the image you are covering.
You can merge the two images in Photoshop to create a final image, taking the best parts of each of the images, effectively removing your thumb and flare marks.
PRO TIP – Take a few shots repositioning your thumb, so you have a couple of images to work within photoshop. It’s not always easy to notice flare marks when viewing the image on the back LCD screen.

Is Lens Flare a bad thing for your Images?
Lanes flare marks don’t always impact negatively on your images. Instead, warm subtle streaks caused by the reflected sunlight can add to the story you’re capturing.
Often when the sun is just out of frame, evidence of light cast across the lens can create a gorgeous artistic element that adds interest and a dynamic feel to the scene you’re capturing.
Some photographers or graphic artists will add a visual element to an image to create a lens flare effect in a photo.
Look at your image, identify how distracting the marks or streaks of lens flare are in the photo, and determine if you should remove them.