I’ve taken photos of a stunning vista, only to be disappointed with the image as it doesn’t reflect the beauty of the location – something was missing. I’ve often found I can improve a landscape photo by including some foreground.
Finding effective foregrounds for a landscape image requires an understanding of how adding a foreground can improve your landscape images.
A compelling foreground initially grabs the viewer’s attention and draws them into the rest of the image. Foreground interest provides more context about the location and extends the story you’re capturing.
Foreground interest improves a landscape photo by incorporating the scene closest to the camera.
Interest in the foreground, positioned in the lower third of the image, can draw the viewer’s eye into the scene and add depth to the photo.
Including more of the scene in the foreground can complement the main subject by adding detail of elements just in front of the camera.
However, it’s not just a case of lowering the camera angle to include whatever is in front of it. You need to carefully consider the foreground you are adding and its impact on the overall picture.
What is Foreground Interest in an Image?
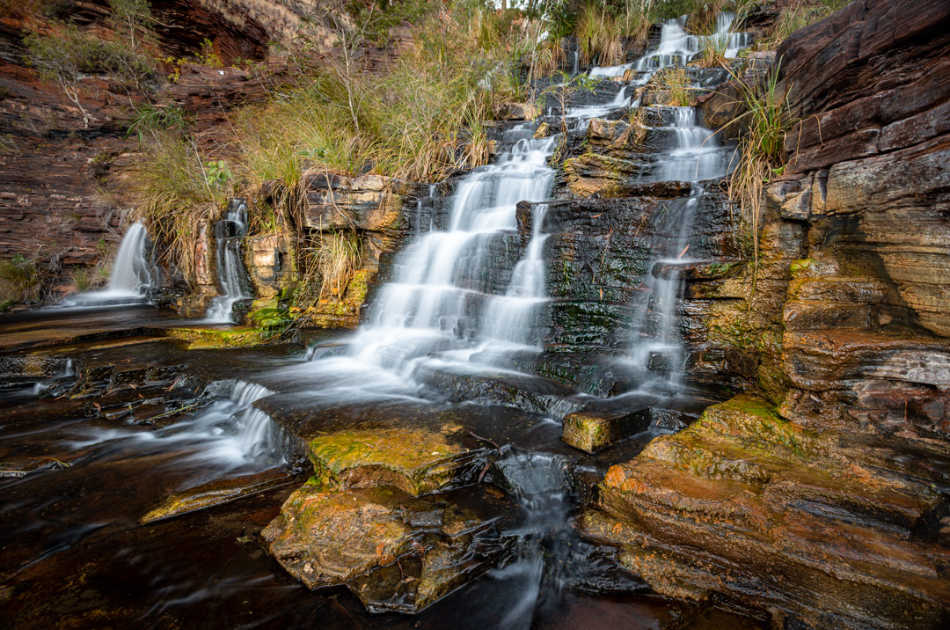
Essentially, foreground interest is the part of the scene that’s close to the camera. When included, the foreground will generally appear in the bottom third of the photo. Elements in the foreground should add interest to the picture through color, texture, or detail.
How do you Select an Effective Foreground?
When selecting elements for a foreground, consider how those elements relate to the rest of the image. Be careful the foreground doesn’t negatively impact the overall composition or block out the main subject in the shot.
Also, you don’t want any added foreground to take all of the attention away from the main story.
Instead, you want to select elements for a foreground interest that extend the story, adds context to the main subject or and expands the view of the location for the audience.
How to Find an Interesting Foreground for a Landscape Image?
When you’re exploring the location and have identified your main subject for your image, take a moment to observe the surrounding area for elements that extend the story but tie in with the rest of the photo.
The foreground will be one of the first parts of the picture that the viewer will notice. With that in mind, look for elements that have;
- Bold colors, like flowers or moss
- Grainy textures, like rocks or bark
- Enticing patterns, like ripples in the sand or water
- Leading lines, like branches or cracks
How to Add Foreground Interest in a Landscape Photo?
Once you’ve selected the elements you want to include in the foreground of the picture. It is then a case of positioning the camera to incorporate the foreground in the shot. For example, you may need to widen the lens’s focal length, angle the camera down towards the ground and move the camera back.
Any adjustment that you make is likely to change the composition. So, reassess the impact adding a foreground has on the entire photo.
What Makes a Good Foreground for a Landscape Picture?
A good foreground adds to the landscape story in the image. It provides an opportunity to show close detail of element the scene. An effective foreground also includes patterns or lines that draw the viewer into the rest of the photo.
Elements in the foreground are often close to the camera, so it’s an excellent opportunity to show fine detail, which can add to the story of the landscape.
For example, if you are shooting a tree, you could include the tree roots that the eroding soil has uncovered.
Tips for Including a Foreground in Your Landscape Images
There are plenty of challenges when attempting to include a foreground in a landscape photo. In addition, you may find some scenes where it’s not easy to incorporate a foreground.
Here are some tips to help you include better foregrounds.
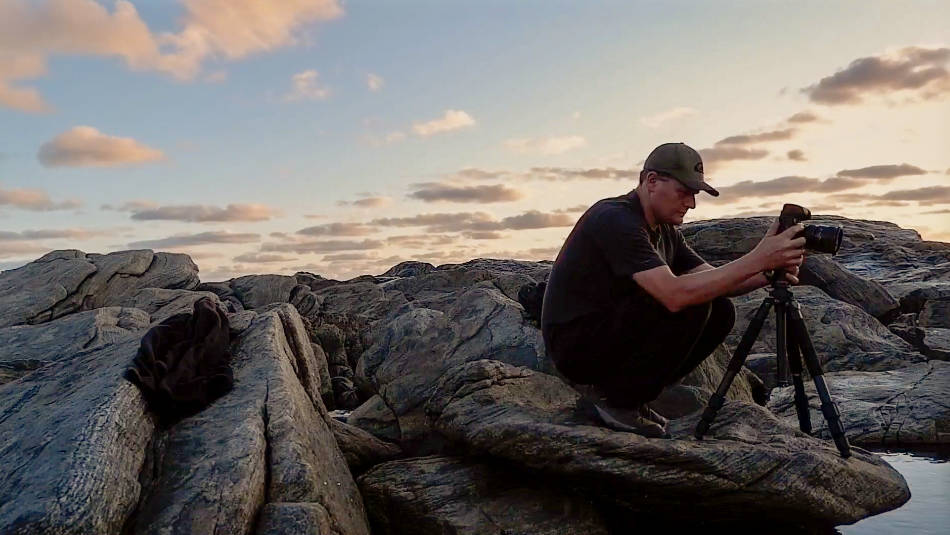
Tip 1. Position the camera low to the ground
One of the most straightforward techniques to incorporate the foreground in the frame is repositioning your camera closer to the ground. In doing so, you can include more of what’s at that level in the shot.
Getting low to the ground with your camera brings so many other benefits. You can find unique perspectives, emphasize specific elements in your shot, and include objects close to the ground in the foreground.
Mounting your camera to a tripod can limit how low you can get your camera as some tripods have a long center column preventing the tripod from being flat to the ground. Some tripods allow you to replace the column with a shorter one to get around this.
Watch that the ends of the tripod legs don’t intrude into the image. If this is unavoidable, you’ll need to remove them in post-processing. Also, some tripods can become unstable when low to the ground, so I suggest using a remote shutter to avoid camera shaking when taking the shot.
Cameras with a flip-up screen make it easier to see the display when low to the ground, which is crucial if you’re shooting for any length of time. The last thing you want to do is crouching over the camera for several minutes, waiting for the light.
It’s not a case of the lower the camera, the better. Keep an eye on the rest of the composition and the impact on the story you‘re telling. The foreground you include should enhance the image.
Tip 2. Use a wide-angle lens
A wide-angle lens is anything that provides a broader field of view than what the human eye typically views, so wider than 35mm, up to around 24mm.
My wide-angle lens is my favorite lens for landscape photography. It’s fantastic for capturing big, expansive landscapes. A wide-angle lens allows you to capture the main subject and the scene around it, providing context to the story.
The nature of wide-angle lenses means they are great for incorporating the foreground in the shot. You can even take this idea to the next level and use an ultra-wide lens, 14mm to 24mm. With such an extensive field of view, you can include the scene from where you’re standing through to the sky.
There are two things to be aware of using wide-angle and ultra-wide-angle lenses;
- They tend to have some distortion in the image. However, this is usually only an issue if your scene includes straight lines, which is seldom the case in the natural environment.
- Wide-angle lenses can make subjects off in the distance seem small and far away. While that can add depth and exaggerate drama in the image, some objects can get lost, decreasing their impact. One way around this is to tilt the lens, positioning the main subjects towards the edge of the frame, where the effect is less pronounced.
Tip 3. Decrease the sky
When working on a composition, we’re often making decisions about what to include and remove from the frame.
If we include more of the foreground, it only makes sense that it would be at the sacrifice of the sky.
It’s important to be aware of what we’re removing and check that we’re not excluding a portion of the scene that’s more interesting or pivotal to the story than the foreground.
When I’m shooting a scene with a clear sky and little interest, I’ll frequently look for an interesting foreground to include in the frame to anchor the photo.
Reducing the sky in the frame is not always ideal, but there are other ways to include more foreground, which leads us to our next tip.
Tip 4. Shoot in portrait orientation
Due to the nature of many landscapes, it is typical to have the camera in landscape orientation. However, an effective way to include what’s in the foreground is to turn the camera around to portrait orientation.
This approach allows us to emphasize the foreground and still retain a good portion of the sky. This technique works well in scenes where omitting the sides of a shot will not negatively impact the final image.
Consider what you’re cutting out and whether the new aspect will change the flow and composition of the image.
I have the cameras I use for shooting landscapes mounted in an L Bracket that attaches to the tripod. An L Bracket makes switching from landscape to portrait and back again quick and easy. Having a relatively cheap accessory like this permanently attached to the camera means I’ll often try both orientations if I’m not sure what will work.
Tip 5. Extend the story
It can be easy to fall into the trap of adding a foreground for the sake of having a foreground in the picture.
A good foreground adds interest and extends the story captured in the image.
Be mindful that the foreground is not distracting or takes away from the main focus of the photo.
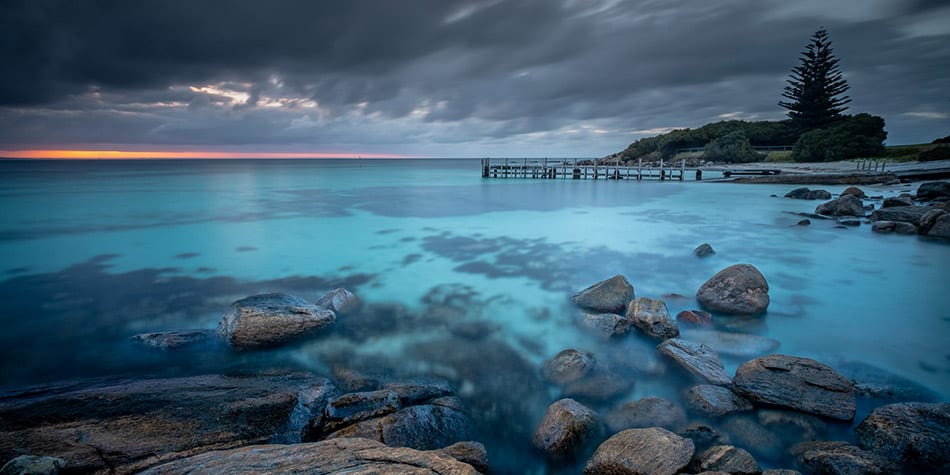
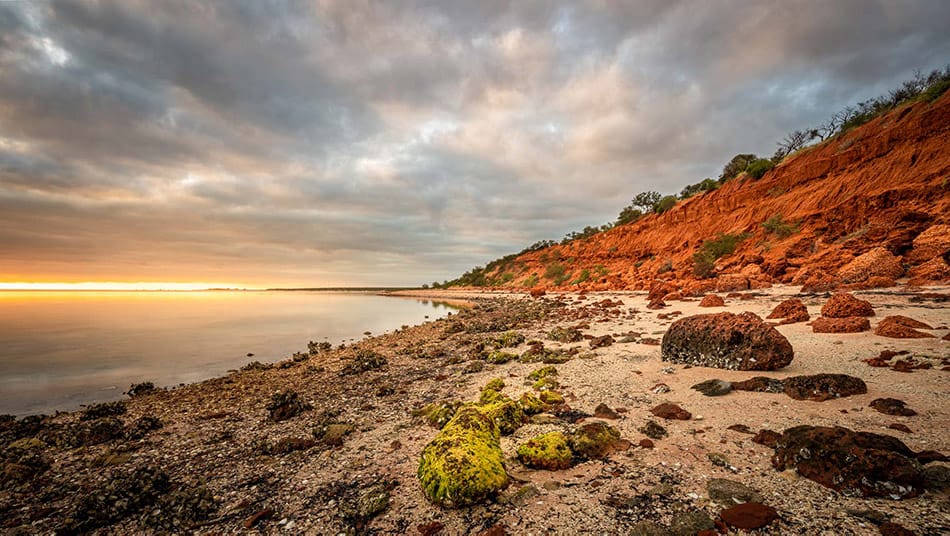
The example below shows a beach on the west coast of Australia with red cliffs. The sand and rocks make up a substantial part of the foreground. However, with the amount of rocks and seaweed, the foreground could be considered messy and distracting.
Look for elements that tie in with the rest of the image.
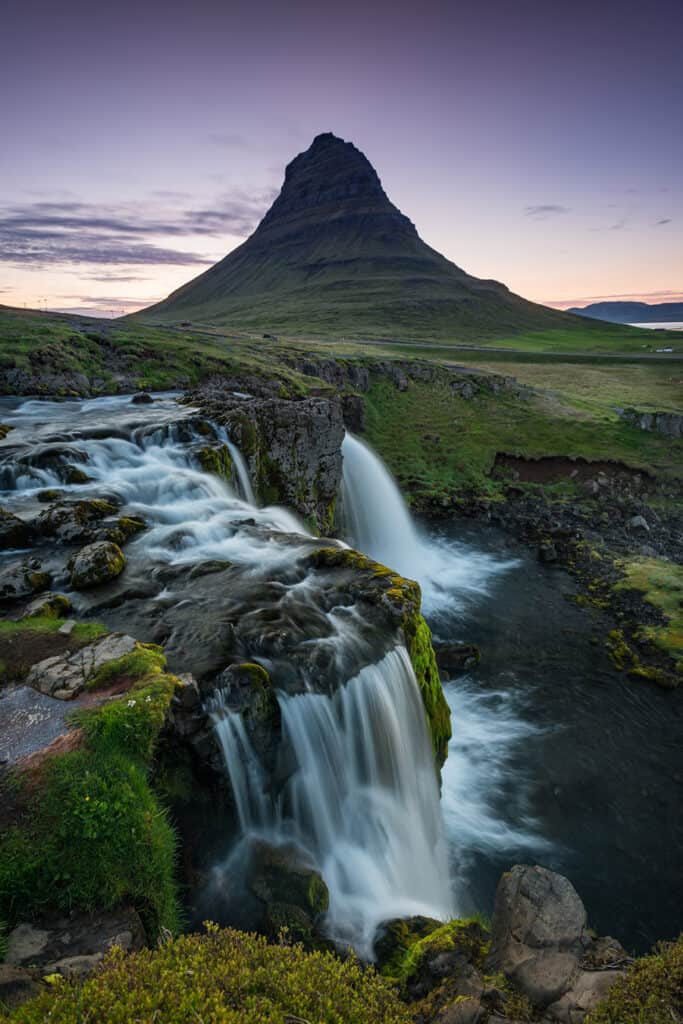
For example, the image below is a shot of Kirkjufell in Iceland. In the foreground, I’ve included parts of the fall, continuing the story of the main falls in the middle ground of the picture.
Tip 6. Watch your focus and exposure
After finding a suitable foreground and working out how to include it in your frame, ensure the foreground is in focus and correctly exposed.
The foreground is likely to be near to the camera. In some scenarios, it’ll be extremely close.
You may find that with the Depth of Field you have, the foreground or background are not in focus. To address this issue, you can focus stack the scene, taking separate shots focused on different sections throughout the scene.
You can then merge those shots in post-processing to create the final image with the entire image in focus.
For more information about Focus Stacking an image, watch my video below as I take you step-by-step through the process.
The foreground can often be darker or lighter than the rest of the scene. This difference in light can be due to the subject’s tone, like a dark log or the angle of the light.
I often encounter this situation when taking seascapes. The rocks close to the camera are dark, and the sun sets behind the rocks, backlighting them. The sky can be very bright compared to the darker foreground.
There are two options;
- Exposure Bracket – You take a shot appropriately exposed for the foreground, the darker area, along with a separate image exposed for the background, the lighter area. You then merge these photos to create the final picture.
- Filters – With some compositions, you can use a Graduated Filter to decrease the light in the brighter areas of the image, creating even light across the scene, allowing you to capture the photo with one shot.
Tip 7. Use color in your foreground
The foreground of an image is a fantastic opportunity to grab someone’s attention when they first view the picture. Therefore, find elements with bold colors to feature in the lower third of your image.
Consider the impact adding elements of color has on the photo. For example, you may add colors that tie in with the rest of the palette in the image. Alternatively, you may choose to introduce a different color that alters the story but adds a dynamic feel to the photo.
Tip 8. Look for leading lines in the foreground
It’s natural for the viewer’s eye to work from the foreground into the rest of the image, but using leading lines can assist in this movement and help make the photo pleasing to view.
Be aware of lines in the foreground that potentially distract or guide the eye to the edge of the frame. Some examples of naturally occurring elements that can create leading lines are cracks in rocks, rock edges, riverbanks, and fallen logs.
Tip 9. Add texture in the foreground
Just like adding color, a foreground with textures can attract the viewer’s eye.
With a foreground near the camera, there are opportunities to show close detail of textures that occur naturally in the environment. Typical textures that make great foregrounds are sand, roots, rock, moss, and tree bark.
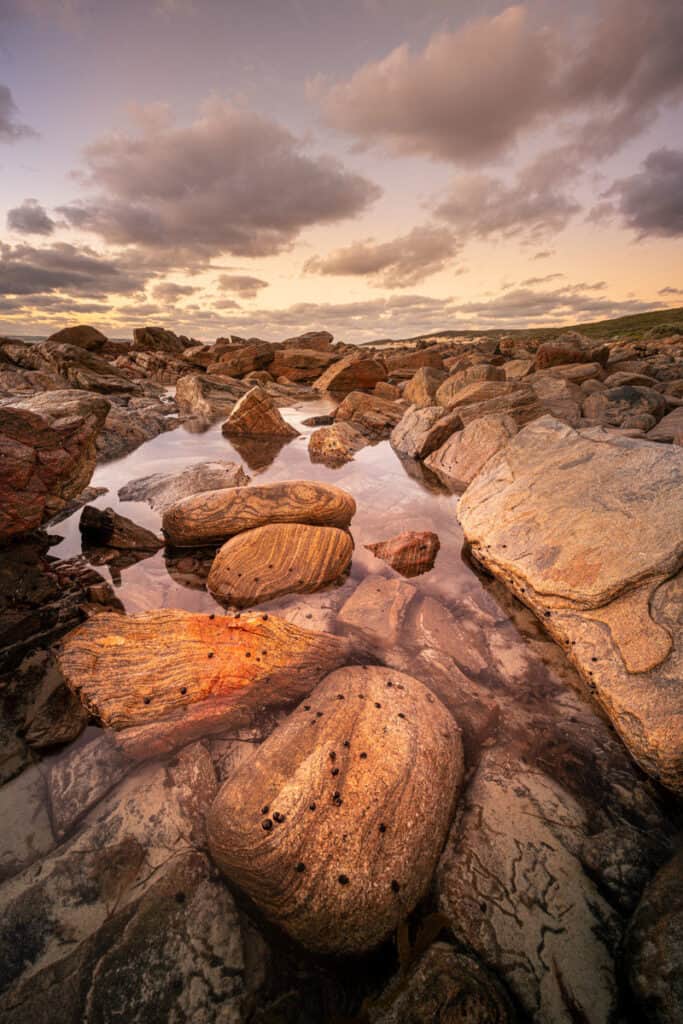
Tip 10. Find shapes and patterns in the foreground
There are shapes and patterns throughout nature. The hexagonal formations of Basalt rock, a triangle created between three rocks, the veins on a leaf, or the eroded sand from the outgoing tide.
These patterns help the viewer make sense of what they are looking at and make the picture more pleasing to the eye. Incorporating patterns and shapes in the foreground can entice the viewer to further explore the photo.
This approach can tie in with adding leading lines (Tip 8) and adding texture (Tip 9).
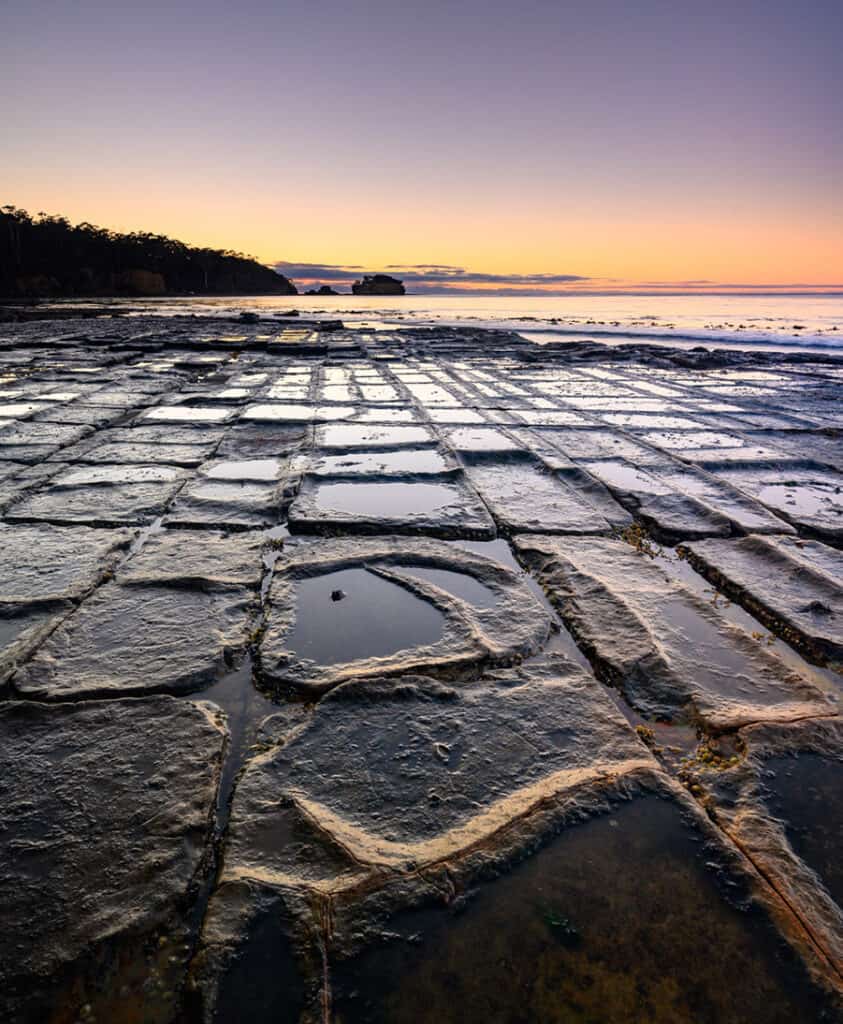
I’ve used this technique when confronted with a potentially messy foreground. Discovering a composition that highlights a pattern in amongst the chaos helps the viewer process the image.
Do you need to use a foreground in your landscape image?
It is not necessary to include a foreground in every landscape image. It’s simply one compositional idea that you can consider when looking for a strong image to shoot.
Have a look back at some of the foregrounds you’ve included in your images and identify the foregrounds that are effective.
When you look at photos that you enjoy from other photographers, note the foregrounds they are using and why you think they are effective.
This exercise will give you great ideas for what to look for when you’re out on location looking for a compelling foreground for your next landscape photo.
QUICK RECAP
A compelling foreground can grab the viewer’s eye, draw them into the scene, provide more context about the location, and extend the story you’re capturing.
Look for bold colors, natural patterns or textures, and leading lines or curves that engage the viewer.
Assess the impact of a foreground on the composition and the rest of the scene.
Avoid distracting or messy foregrounds, and don’t add a foreground for the sake of it.
A foreground should enhance the story and positively impact the final image.