When I’m exploring a location, I often keep an eye out for leading lines to incorporate into my image to strengthen the composition.
To capture better pictures, it’s helpful to know how leading lines improve a landscape photo.
Leading Lines improves a landscape picture by guiding the viewer’s eye through the image. Lines are an effective way of taking a person’s attention to more interesting parts of the scene helping them explore the area as if they were standing in the location.
Taking your landscape photography from average shots to compelling images often just requires a small tweak to your composition, like including leading lines to draw viewers into the scene.
However, the right leading lines are not always easy to find, and it’s essential to know how to use them effectively to enhance your composition.
What are Leading Lines in a Landscape Image?
As the name suggests, a leading line is any line with in the frame that guides the viewer’s eye.
Some leading lines can make a composition stronger by moving the eye from one part of the picture to another in a way that feels natural to the viewer.
However, some lines can weaken an image by distracting or awkard to view as they can take the eye away from the main subject or directs the audience to the frame.
It’s helpful to be aware of the impact that leading lines have on your image so you can make adjustments and improve the photo you’re capturing.

Where to Find Leading Lines for a Landscape Photo?
You can find leading lines everywhere in nature.
Individual objects in a landscape can make effective leading lines, like a fallen tree, a single leaf, or blades of grass.
You can find lines where two elements meet, like the water and the sand at the beach.
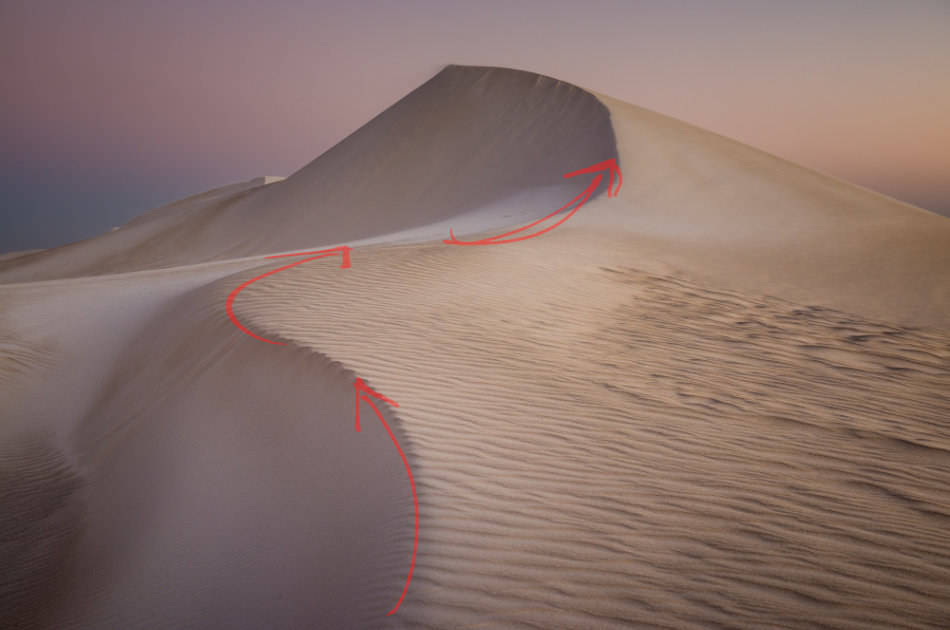
The edge of an object, like a mountain ridge, can be used as a leading line.
Natural patterns can be guiding lines in a photo, like layers in a rock or the marks created by the water draining out to the sea at low tide.
Captured movement of an object can generate powerful leading lines, like water running down a river or over rocks.
Implied lines between elements can make great guiding lines, like a row of trees or the path between rocks.
What Makes Good Leading Lines for a Landscape Photo?
An effective leading line encourages the viewer to move their eye from one part of the photo to another.
This movement should feel natural and direct the viewer’s attention to interesting aspects of the scene you’ve captured.
Do Leading Lines Need to be Straight?
Leading lines can be curved and straight. Lines that occur in nature are often curved and create a relaxing line that guides the eye. The ‘ S ‘ curve is a common line used in landscape pictures, effectively drawing the viewer into the scene.
How to Create Leading Lines in a Landscape Picture?
While you can find a range of leading lines in natural scenes, it’s not always easy to incorporate them in the frame in a way that enhances your landscape picture.
So here are 10 tips for including leading lines in your landscape photos.
Tip 1. Draw the Viewer into the Image
When including leading lines in your photo, use the lines to draw the viewer into your image.
It’s natural for the viewer’s eye to move from objects closer to them to elements further away. Elements closer to the camera often appear in the scene’s foreground, which commonly takes up the lower third of an image.
Look to position leading lines just in front of the camera that encourages the viewer to move into other parts of the scene.
RELATED: Having a strong foreground that grabs the viewer’s attention and pulls them into the scene can be the foundation of a compelling landscape picture. Check out this article to learn more about how to take better landscape photos using foreground interest.
Objects that are close to the camera appear bigger. An element near the lens you use as a guiding line doesn’t need to be large to seem significant in the photo.
A blade of grass or a single leaf close to the camera can be effective pathways for the viewer to follow.
Tip 2. Look for Naturally Occurring Leading Lines
Lines that lead the eye can be found everywhere in nature. See the section about where to find leading lines for a landscape photo and different naturally occurring lines.
The power of naturally occurring lines is they are part of the landscape and, therefore, part of the story.
Using natural elements in the scene for your leading lines helps guide the eye subtly so it is not as evident to the viewer.
While you can create a leading line with the edge of a leaf, you should also look for details and patterns, like the veins within the leaf, to help guide the eye.
Captured water movement can make practical guidelines for the viewer as the water will naturally follow a path.
Tip 3. Utilize Human-made Leading Lines
In an ever more populated world, it can sometimes be challenging to find landscapes that are completely void of the impact of humans.
However, in situations where there is evidence of man-made features, there are opportunities to utilize these elements as powerful leading lines.
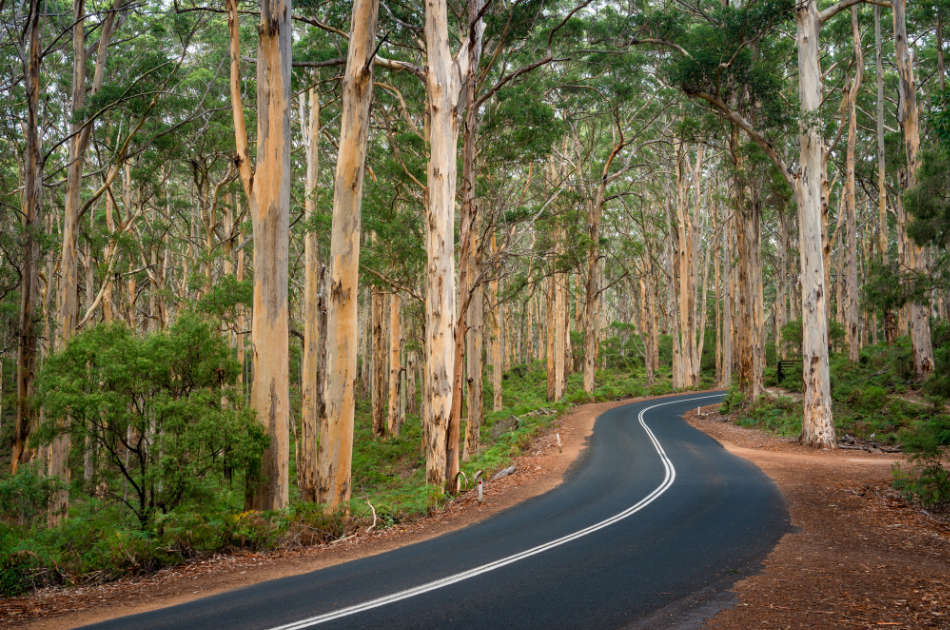
By their very nature, roads and pathways can provide strong lines that can guide the eye.
Other Examples of human-made leading lines include:
- Bridges
- Hand Railing
- Jetty
- Train Tracks
- Fencing
- Orchard Trees
- Roads
- Pathways

I’ve found pathways make practical guides for the eye as it’s easy for the viewer to imagine walking through the scene, helping create a more enticing landscape photo.
Tip 4. Find Lines that aren’t Obvious
If you think about typical leading lines, you are probably visualizing lines in the bottom third of a photo, moving the eye up into the scene.
While these lines are effective, leading lines in other directions can create fantastic guides for the viewer’s eye.
Look for leading lines that you can form in any cloud in the sky. Any type of cloud might be suitable, but high-level Cirrus, Cirrocumulus, and Cirrostratus clouds can be good for this.
Using shadows is another way to create leading lines in a landscape picture. This technique works well with a backlit subject, forming shadows that run out towards the camera.
The sunlight shining through the clouds or fog often casts rays of light that form powerful leading lines within a composition.
A leading line within an image may not be an actual line or edge, but instead, implied lines can exist from one object to another, like trees or rocks.

Horizontal lines can not only lead the eye but also have a calming effect on the viewer. The horizon of a scene is the best example of this approach.
To achieve a relaxing feel within a scene, ensure your horizon is level. If it’s not, the picture can feel unbalanced and awkward to view.
Diagonal lines can add a dynamic feel to your image and is a great way to bring the eye’s attention from the corners of the photo towards the center.
Using diagonal lines encourages the viewer to move around the scene from one side of the image to the other.
Vertical lines are effective in simple scenes and symmetric compositions.
Tip 5. Move the Viewer’s Eye through the Image
We’ve talked about how lines guide the eye, but why is this important in a landscape picture?
Photos of landscape scenes are more engaging when your eye is taken on a journey through the image.
Creating natural pathways through the photo encourages the viewer to explore the elements you’ve included in the frame.
Moving the viewer’s eye in this way is a form of storytelling as you take the viewer on a journey through the landscape.
Use leading lines to create or enhance the flow within your landscape picture. This approach can bring intrinsic energy to your image, intuitively guide the eye, and help create a calming experience.
Tip 6. Lead the Viewer to the Main Subject
When the landscape shot you’re capturing is composed around a prominent feature within the scene, as discussed in Tip 5, you ultimately want to guide the viewer through the picture to that point.
While you use leading lines to draw the viewer into the scene, the lines should direct the viewers’ attention to the main subject of your landscape photo.
This approach helps make what the picture is about obvious to the viewer.
The opposite is true. If the lines you have in your picture take the viewer’s attention away from the main subject, it weakens the composition as they may feel lost.
Be aware of where any line in your picture potentially guides the viewer, even if you don’t intend for it to be a leading line.
Tip 7. Use Converging Lines to Create Attention
As we’ve discussed, a line in a landscape picture is a powerful way to guide the viewer into the scene and make the image more enticing.
Using multiple lines can increase this effect. Furthermore, if the lines are converging, it can make the photo even more compelling,
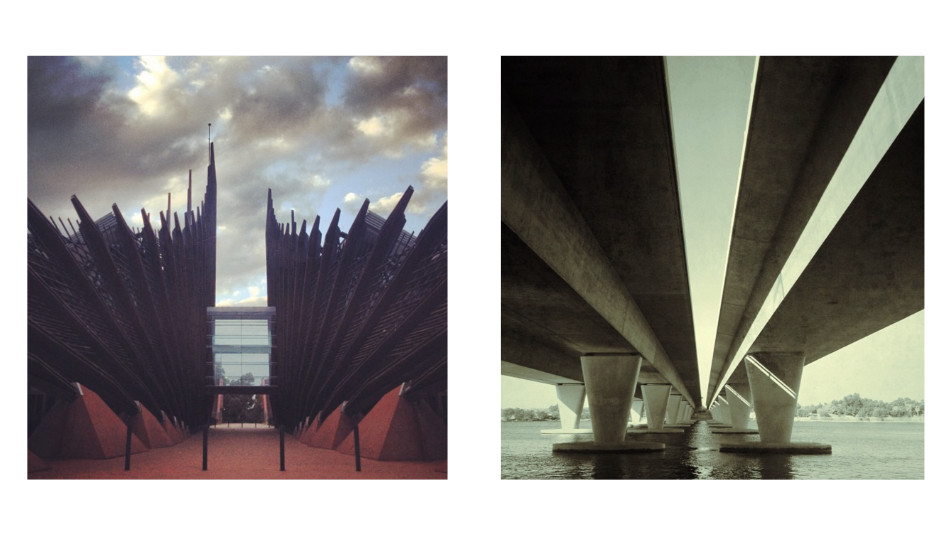
Not only can lines provide a guide for the eye, but they can also draw the viewer’s attention to a subject within the scene.
Intersecting lines within a composition effectively attract attention to a particular part of a landscape picture.
Tip 8. Watch for Distracting Lines
As a general rule, create lines going from the edge towards an area closer to the middle of your photo.
Lines that don’t follow this rule and instead guide the viewer towards the edge can weaken an image as they often take the attention away from the main interest in the shot.
In Tip 6, we covered the flow of an image and how leading lines can introduce or complement a landscape image’s natural feel and pathways.
Lines that appear in an image can sometimes have the opposite effect and work against the pathways you’ve created, potentially making the picture awkward to view.
While leading lines can significantly improve a landscape image, the photo is not necessarily about the lines themselves.
It’s helpful to keep this in mind so you don’t miss capturing the rest of the landscape’s story and taking a picture that engages the viewer with emotion.
RELATED: There are four principles for taking good landscape photos that are compelling and will impress your friends. For more, check out what makes a great landscape photo.
Tip 9. Don’t worry about being too Precise
When I run my photography workshops, I often see participants getting sidetracked as they compose their shots by focusing too much on how precise they position the leading lines in their photos.
For example, in an image with a guiding line from the bottom left corner, a common mistake I see people make is attempting to compose the scene with the line precisely aligned with the corner of the frame.
Unfortunately, this strategy can sometimes overshadow the rest of the composition.
It’s better to have the line coming from the general bottom-left area of the image. The line will act as a guide for the viewer’s eye.
While it is important to be mindful of the impact of leading lines, getting them to align exactly with specific points like corners or intersections of thirds is not necessary.
I frequently come across a general misconception that photographers determine how good their composition is by evaluating how precise any leading line is. Unfortunately, having a line come exactly out of the bottom corner doesn’t necessarily make the composition stronger.
Instead, it’s more helpful to assess the overall feel of the your image.
Tip 10. Edit your Image to Emphasis Leading Lines
You make half of your landscape image in the field and create the rest when you edit the final image.
During the editing process, you should look for opportunities to improve aspects of your landscape picture. One way to do this is to enhance the leading lines you incorporated in your image.
Subtly bring up the brightness of the pathways you’ve created in your composition by making small exposure adjustments. By brightening these areas, the viewer’s eye will naturally be drawn to them and guide the eye as you intended.
Equally, bringing down the exposure just a little in other areas will have the same effect.
Another technique is to warm the leading lines within the photo by increasing the orange and yellow to these specific areas using the brush and radial tool to apply the adjustments.
These shouldn’t be noticeable changes to the viewer, so the edit still feels natural.
Are all Lines Leading Lines?
Every line in your photo doesn’t have to lead the eye.
Lines can create energy, symmetry, separation, and depth within your composition.
However, the human eye intuitively follows any straight or curved line present in a photo.
As you’re composing the scene, consider each lines within the frame and assess the impact they are having in your photo.
If there’s a line that’s potentially guiding the eye is a positive way, see if you can adjust the compoistion to levage the leading line, making it more proniment and strength the image.
Can Leading Lines Negatively Impact Your Image?
Not every line will guide the eye to an area of the image that’s ideal.
Some lines may take the viewer towards the frame’s edge, weakening the picture’s composition.
When there is a line that’s taking the eye away from the main feature in the landscape or potentially distracting, look at ways to make changes to the composition to minimize it’s impact or remove it al together.