The dynamic light around the coast can make seascapes incredibly rewarding to capture, but the light can create some challenges.
So whenever I venture down to the beach, I have my trusted ND Grad filters handy.
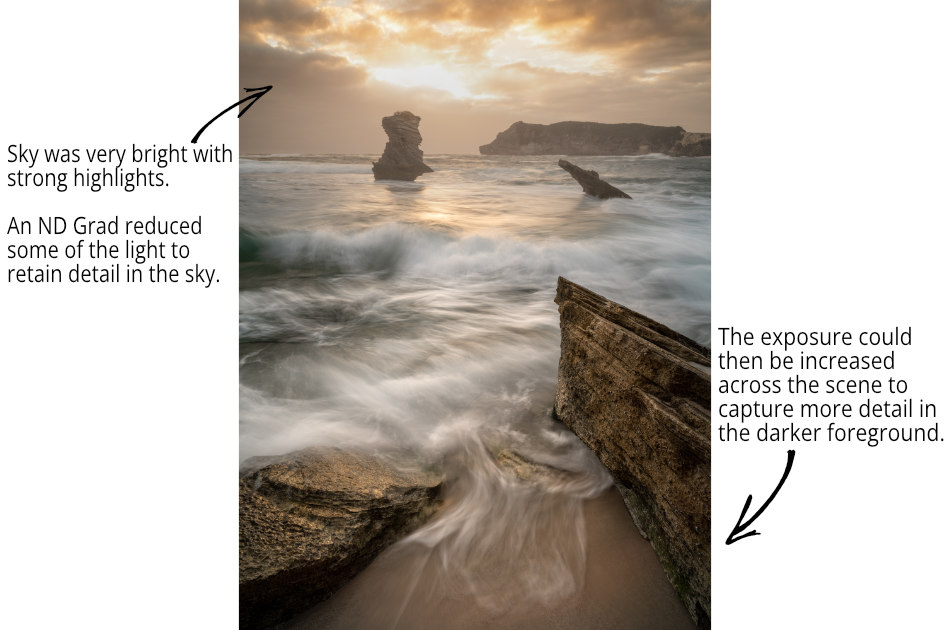
Neutral Density Graduated filters reduce the light in the brightest parts of the scene, so the dynamic range is less extreme. In doing so, an ND Grad filter allows you to increase the exposure across the scene, so details in the darker areas can be captured camera.
At the beach, you can encounter different types and intensities of light.
In most seascapes, the sky is the brightest part of your photo, even more so if you shoot at sunrise or sunset.
The foreground is often darker, and if backlit elements are close to the camera, there can be areas in shadow.
This is when you need an ND Grad filter.
A good quality Neutral Density Graduated filter can help to even out the light in the scene, ensuring the highlights aren’t blown out and the camera can pick up details in the shadows.
Enhance Your Seascape Photos with ND Grad Filters
There are a few scenarios where an ND Grad can help improve the detail your camera can capture, making your seascape image more interesting.
What is a Neutral Density Graduated Filter?
An ND Grad is a glass or resin filter where half the filter is transparent, allowing the light through, and the other half is darker. The dark portion of the ND Grad is designed to reduce the light passing through that part of the filter.
Neutral indicates the filter’s neutral tone, producing a minimal color cast to your image.
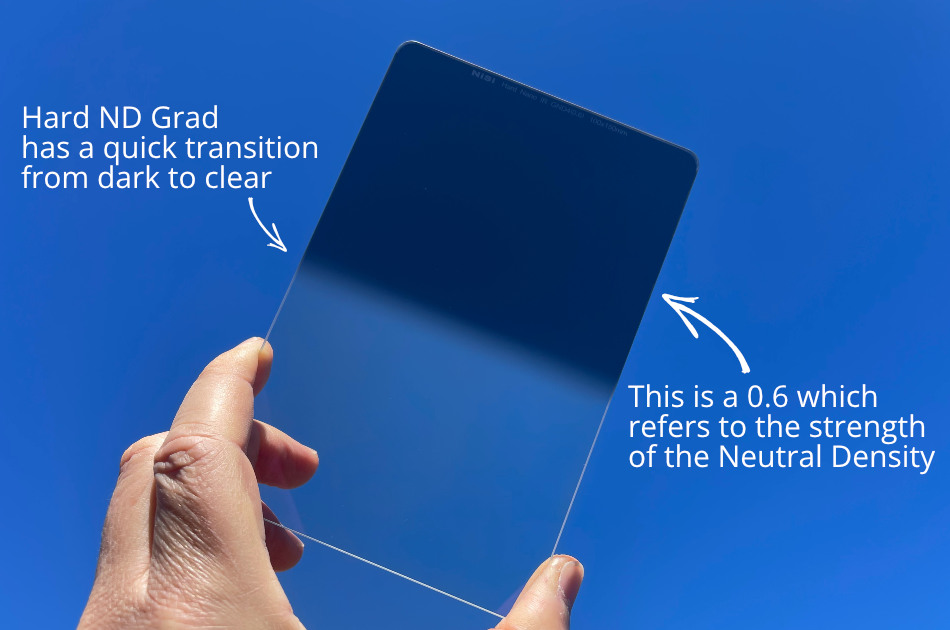
Density refers to the darkness of the filters, which come in different strengths from 0.3, 0.6, and 0.9 to 1.2. The stronger the density, the more light the filter will reduce in that part of the filter.
Most ND Grads come in Soft and Hard versions, and some brands offer Medium. This alludes to how quickly the filter graduates from the dark section of the filter to the clear area. With all of these filters, the transition occurs in the middle of the filter.
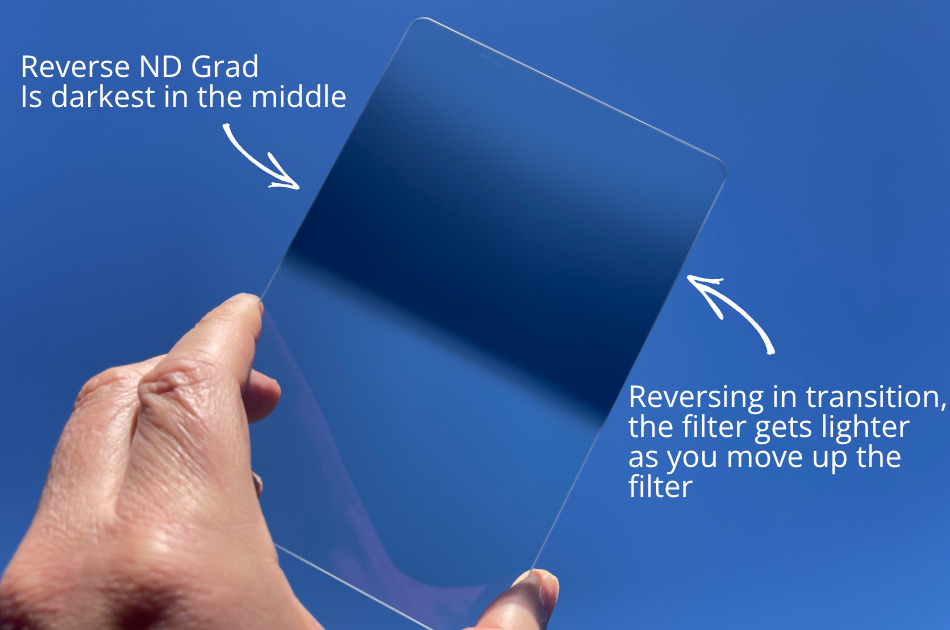
In addition, there are also Reverse ND Grads where the density is heaviest in the middle of the filter, and it transitions to clear the closer it gets to the edge.
Finally, some manufacturers offer a Horizon ND Grad with the darker part only in the middle of the filter.
Which type you use depends on how the lighter areas of your scene borders with the darker areas.
Which Neutral Density Graduated Filters Are Better for Seascapes?
Filters that have a quicker transition from dark to clear, like a Hard ND Grad filter, are more suited to capturing seascapes. This is because the brighter sky reaches the darker ocean, creating a straight border. This flat horizon can be aligned easily with the harsher gradation of the filter.
However, suppose there are rocks in the mid-ground, or your shot includes both the sea and land, creating an uneven horizon. In that case, it’s more appropriate to use a filter with a gentler transition, like a Soft or Medium ND Grad, so you avoid adding an unnatural band in the image.
Sometimes the light coming from the sky is not even and doesn’t require the same amount of filtering,
In overcast conditions, with a low sun, the sky close to the horizon may be brighter than the clouded area higher in the sky. In this scenario, you’ll get better results using a Reverse ND Grad where the density is less the further up the filter you go.
The darkest section in the middle of the Reverse ND Grad filter can be positioned over the brightest part of the sky close to the horizon. The sky further above from the horizon will align with an area of the filter with less density, removing less light and giving you a more even tone across the sky.
Taken a step further, a Horizon ND Grad is only dark near the middle of the filter, so it can be used to reduce light where it is brightest in the sky, just above the horizon. You can find out more here.
After trying various filters for the past ten years, I’ve found these filters produce the best results.

NiSi Medium ND Grad
A Medium or Hard ND Grad are the perfect filters to help you control the light in Seascape scenes and ensure you don’t blow out the highlights in the sky.
How Does an ND Grad Filter Improve Seascapes?
There are particular challenges when working with the light conditions found in seascape scenes.
ND Grad filters can be beneficial in controlling the light when capturing images in the unique conditions found along the coastline.
Why is the light so challenging for Seascapes?
One of the toughest lighting conditions is when one part of the landscape is much brighter than the rest of the scene.
This is often the case when shooting seascapes, especially if you are shooting a sunrise or sunset when the sunlight is coming from a low angle.
Save your highlights with an ND Grad
The sky will be brighter than the foreground in a typical seascape scene.
If the sun is low and in the frame, you may get direct sunlight into the camera.
Even if the sun is just out of frame or behind some clouds, the sunlight bounces around the clouds, resulting in a bright sky.
If the exposure is too high, you will blow out to the brightest parts of the image, referred to as highlights.
When the highlights are blown out, the detail is lost and can’t be recovered in post-production. This is why we set the exposure to ‘expose-to-the-right’ and protect the highlights.
Highlights in seascapes are most likely in the clouds and the breaking waves, the brightest and whitest parts of the image.
These details are essential to capture because they add interest and intrigue to the photo. However, if there are areas where the features can’t be adequately seen, it can be distracting to the viewer.
A Neutral Density Graduated filter is the perfect tool for this situation.
Positioning the darker part of the filter over the brighter part of the image will remove some light from that portion of the scene.
As the camera is capturing less light from the areas in the image that have the brightest parts, you are less likely to blow out the highlights and instead retain the details in these elements.
Capture more detail in the shadows with an ND Grad
Foregrounds are often a powerful feature in engaging seascape photos, as they grab the viewer’s attention and pull them into the rest of the image.
The more impressive the detail you capture in elements close to the camera, the more compelling foreground will be.
However, foregrounds are generally dark because;
- they are not in direct sunlight,
- elements in the foreground, like rocks, are darker in color
- foregrounds objects are backlit with the sun behind them, and
- gaps in-between foreground elements like rocks create shadows.
If the sky within the seascape scene is brighter than the foreground, you’ll be limited in how much you can turn up the exposure as you’ll risk blowing out the highlights.
The solution is to place an ND Grad filter in a position so the light from the sky is reduced. The clear part of the filter should be over the darker foreground so any light from that area of the scene is not impacted.
With the foreground already dark and the sky not darkened by the ND Grad filter, you can safely increase the exposure across the scene without blowing out the highlights.
Reduce the Dynamic Range with an ND Grad Filter
The difference between the brightest part of the scene and the darkest part is called the Dynamic Tonal Range.
The human eye is far more sophisticated than the sensor in a camera. Due to its ability to adjust quickly to varying light conditions, the eye can see detail in a scene with a wider Dynamic Range than a camera can handle.
The Dynamic Range of modern cameras is around 14 to 15 stops of light. Therefore, if the Dynamic Range of a scene is any wider, the camera cannot capture detail in the darker and brightest areas within a single shot.
You can use an ND Grad Filter to reduce the light coming from the brightest parts of the seascape. This narrows the Dynamic Range within the camera’s capabilities so the seascape can be captured in one image with detail across the entire scene.
When should you use an ND Grad Filter with Seascapes?
The easiest way to determine whether you need an ND Grad filter is to look at the Histogram on the camera.
Most cameras have a built-in Histogram feature that you can enable in Live View. A Live Histogram allows you to monitor the exposure of your scene.
The Histogram will change as you adjust your exposure.
If the Histogram chart touches the left and right edges of the histogram simultaneously, the dynamic range of the scene is beyond that of the camera, and you’ll need to use an ND Grand to reduce the brightness of the highlights.
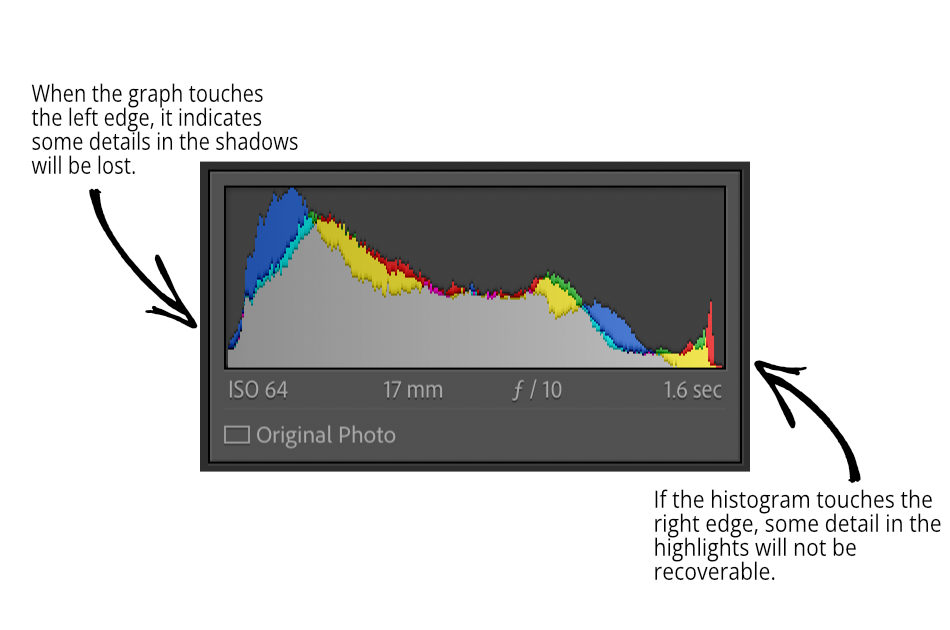
Of course, you don’t need to see this evidence on the Histogram to decide whether you want to use an ND Grad.
The more you experience different seascapes, the better you’ll become at determining if a scene will likely require an ND Grad filter.
Even if the Histogram is close to the edge but not quite touching, I’ll use an ND Grad filter to play it safe.
If you stay shooting a seascape at sunset or sunrise for over 20 minutes, the amount of light in the scene will change, requiring you to adjust the exposure accordingly. In addition to the amount of light, the dynamic range of the light will also vary.
So keep in mind you may need to add or remove an ND Grad filter as the light alters throughout the shoot.
How do you use an ND Grad Filter for Seascapes?
Once you’ve decided you need an ND Grad filter, the next step is to work out which one.
When to use a Soft ND Grad versus a Hard ND Grad
If the border between the lighter and darker areas of the scene is close to a straight line, and the change is relatively abrupt, you’ll require a Hard ND Grad filter.
In a typical seascape, the border between the brighter sky and the rest of the image is the horizon, formed where the sky meets the ocean, which is usually flat and straight.
The transition of the Neutral Density on a Hard Grad filter is sudden, creating a noticeable line in the image where the filter changes can be aligned with the horizon.
A few months ago, I was exploring a beach on the west coast and found a seascape shot where the border between the lighter and darker parts of the image wasn’t a straight line. Instead, large granite boulders created an irregular boundary between the brighter background and darker foreground.
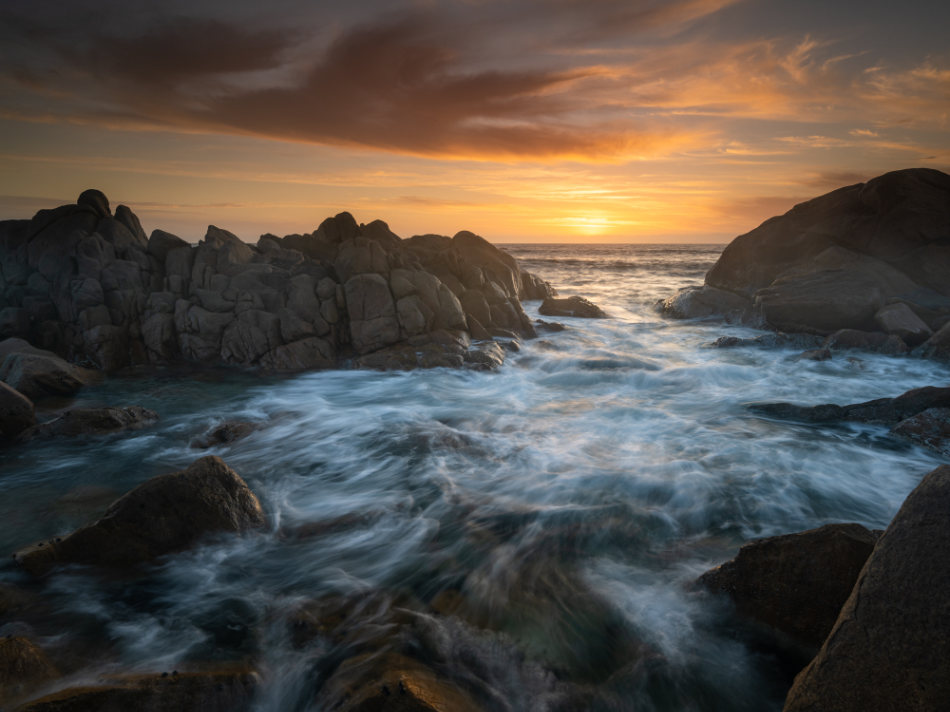
If I had used a Hard ND Grad filter, the line of the harsh transition would have shown up on the large rocks. So instead, I used a Soft ND Grad, which had a gentler gradation to reduce some of the light from the sky and avoid impacting the light reflected from the rocks for a far more natural effect.
Selecting the Correct Strength of Neutral Density Grad Filter for Seascapes
Seascape scenes can have a wide range of light intensity and strength, particularly at sunrise and sunset. So not only will you require an ND Grad filter, but it will also need to have a strong enough density to remove enough light to reduce the dynamic range down to what your camera can handle.
Check out this video to see how I created the image above. I explain the composition and the settings I used the capture the shot.
Honestly, there’s no magic formula for picking the right ND strength.
The greater the difference between the lighter and darker areas of the scene, the stronger ND Grad you’ll need.
So if the camera is pointed towards the sun and the sun is low, any foreground will be backlit and much darker than the sky. In this case, you be better off with a 0.9 or 1.2 ND Grad filter.
On the other hand, if the sun is higher in the sky and there’s not much in the foreground creating any shadows, you’ll need a 0.3 or 0.6 NG Grad.
As you experience different seascape scenes, you’ll improve your eye and naturally get better at selecting the correct ND Grad.
Being adaptable to the conditions is key, and having gear that will allow you to adapt is critical.
I usually shoot seascapes when the sun is very low and continue shooting well after the sun has set. Most of the time, I start with a 0.6 ND Grad. However, if the scene needs a stronger ND Grad to reduce more of the light, I’ll add a 0.3 Grad, giving me the equivalent of a 0.9 in total. Alternatively, I’ll replace the 0.3 and 0.6 with a 0.9 ND Grad.
If the scene requires a filter with less strength, I’ll swap out the 0.6 with a 0.3 ND Grad.
Being adaptable to the conditions is key, and having gear that will allow you to adapt is critical.
That’s why I prefer a square filter mounting system like this one from NiSi.

NiSi Starter Kit
This Starter Kit from NiSi is an excellent way to begin your journey. It comes with the filter holder, CPL, 1 ND filter, and ND Grad filter.
This gives me the flexibility to have multiple square ND Grad filters that I can stack in front of the lens along with a Circular Polarizer, which I’ll always use for seascapes.
Do you need ND Grad Filters for Seascape Photography?
If you don’t have any ND Grad filters, you can still capture a beautiful seascape by exposure bracketing the scene. This is where you take one shot that you’ve exposed correctly for the sky and another shot exposure for the darker foreground of the image.
In editing software like Lightroom and Photoshop, you can merge the two exposure shots and, in doing so, have detail in both the lightest and darkest areas.
However, I prefer to utilize ND Grad filters for seascapes because the scene usually has moving elements, like waves, water or even seaweed. As the two exposed shots are taken seconds apart, those elements will have moved and can become challenging to line up or deal with as you attempt to merge them.
I also prefer to view the image I’m about to take in Live View on the back of the camera as close to the final image, and you can’t do that with a high dynamic range beyond that of the camera without using ND Grad filters.
QUICK RECAP
Seascapes often have extremes of bright and dark areas in the scene, creating a dynamic range beyond what most cameras can capture in one shot.
Aligning an ND Grad filter so the darker part of the filter is over the brightest area of the scene reduces light and narrows the dynamic range.
Decreasing the dynamic range allows the camera to take the seascape in one shot capturing detail in the lightest and darkest areas.
Use a filter system with an integrated CPL that also allows you to stack multiple filters so it’s easy to adapt to different light conditions.