Seascapes are one of my favorite things to shoot. The energy of the waves and the dynamic light provide ever-changing scenes.
To help capture stunning seascape images, I always take my filters for shooting at the beach. But with so many filters out there, it’s not always easy to know which filters you should use for seascape photography.
The filters I use the most when taking seascape are:
- A Circular Polarizer (CPL)
- 0.3 Hard Grad Neutral Density Filter
- 0.6 Hard Grad Neutral Density Filter
- 0.6 Soft Grad Neutral Density Filter
- A Reverse ND Grad Filter
- An Horizon ND Grad Filter 4-Stop ND16
- 6-stop Solid ND Filter
Use a Circular Polarizer to cut glare from wet surfaces and a Hard Graduated ND Filter to reduce the brightness in the sky. An ND Reverse and Horizon Grad Filter is useful when the sun is low and the light is intense. Slow the shutter speed using a 6-stop ND Filter for long-exposure seascape images.
These filters are used for different purposes to achieve a particular effect in an image.
Let’s look at how each filter impacts the light and how you can use them to capture beautiful seascapes.
Enhance Your Seascapes with a Circular Polarizer
A Circular Polarizer (CPL) is a must-have filter for seascapes. It removes distracting glare from wet surfaces like rocks and cuts through reflections on the water’s surface. A CPL can also strengthen the blues and greens within a scene, making them more naturally saturated.
As a result, you’ll find a polarizer attached to my lens for most of my seascape shots.

NiSi V7 Filter Holder Kit with True Color CPL
This Circular polarizer is integrated into the filter holder. The filter is mounted in front so the polarizer can be rotated independently while mounted to the lens.
How Does a Polarizer Elevate Seascape Images?
The image on the left was taken with the polarizer not engaged. You can see the glare coming off the rocks surrounding the pool of water. The sky also reflects off the water, preventing the camera from seeing any detail underneath the water’s surface.
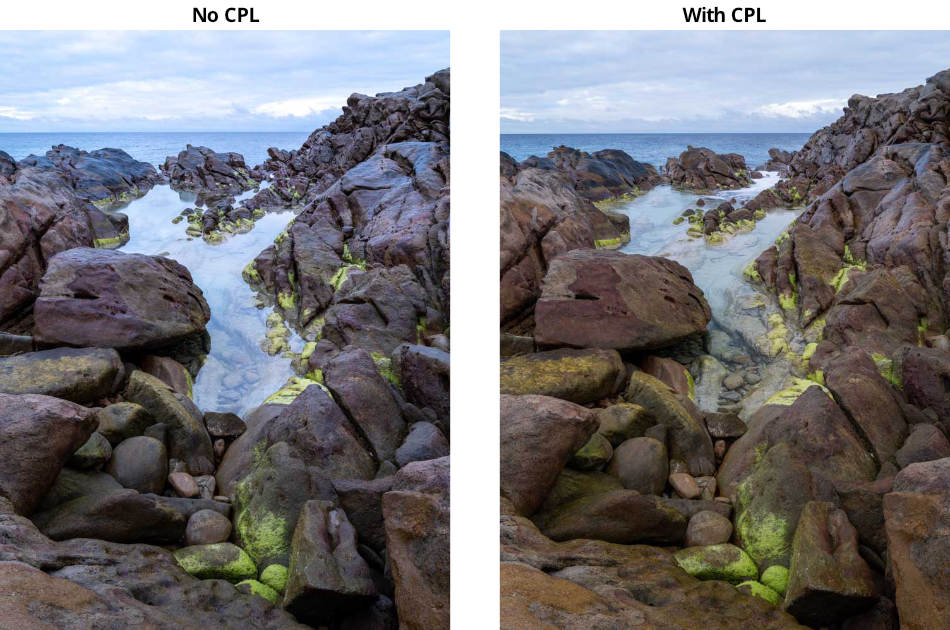
The image on the right was shot with the CPL fully engaged. As a result, the glare from the rocks is reduced, and so is the reflection from the water pool, so the camera picks up the detail beneath the water.
The colors in the image taken with the CPL are generally more saturated.
Both images have not been edited, but the image capture with the Circular Polarizer provides a better starting point for post-processing.
Use Graduated Neutral Density Filters to Control Light in Your Seascapes.
Neutral Density (ND) Grad filters have a darker tint on only part of the filter.
You use Graduated ND Filters to control the amount of light that passes through the lens.
If your seascape has a bright sky and darker foreground, the wide dynamic range (or tonal range) may be beyond your camera’s dynamic range.
If this is the case, some details in either the highlights or shadows will not be captured in the image in a single shot.
An easy solution is to position the dark portion of the filter over the brightest part of your scene to reduce the light in the area.
This evens the light across the scene, reducing the dynamic range, and allows you to capture the landscape or seascape in one shot.

NiSi Medium ND Grad
A Medium or Hard ND Grad are the perfect filters to help you control the light in Seascape scenes and ensure you don’t blow out the highlights in the sky.
Different types of ND Grad filters are designed to handle different light and scene scenarios.
Hard Grad ND Filters have a quick transition point from dark the clear. This makes them perfect for scenes with a straight line between the brightest part of the scene and the rest of the landscape.
In many of the seascapes I shoot, the brighter sky usually borders the rest of the scene at the horizon, which is straight. To address this, I’ll place a Hard Grad ND Filter in the filter holder and position the transition point to align with the flat horizon.
There are some seascapes where there may to boulders or other objects in the scene that create an even border between the sky and the land. A Hard Grad ND Filter would leave a transition line in the image, so it is better to use Soft Grad ND Filter that provides a more gentle transition from dark to clear.
This way, some of the light is still removed from the bright sky, but the filter doesn’t impact the light from the darker subjects as much.
Reverse Grad ND Filters are helpful when the sky’s brightness is more intense on the horizon and the light gets less bright higher in the sky. This trickier light often occurs when there is cloud cover, and the sun is low in the sky around sunset or sunrise.
On a Reverse Grad ND Filter, the darkest part of the filter is near the middle of the filter, and it transitions gradually as you move up toward the edge.
Like the Hard Grad ND Filter, it is better to use a Reserve Grad when there is a flat horizon in your seascape.
An ND Horizon Filter takes the concept of a Reverse ND filter a step further, so there’s only a band of darker density near the middle of the filter.

NiSi Horizon ND Filter
The Horizon ND Filter is ideal when the sky’s brightest part is just above the horizon. Perfect for sunrise and sunset shots.
Horizon ND Filters are ideal for shots taken at sunset and sunrise when the brightest light in the image is just above the horizon. The dark band of the filter can be positioned so the band is precisely over the intense light on the horizon.
How Do Grad Neutral Density Filters Enhance Seascape Photos?
Once I’ve used the Grad ND filter that best suits the scene, the camera can capture the details in the highlights.
Like in the image below, the sky was brighter than the rest of the scene, so some detail in the cloud would be blown out and lost.
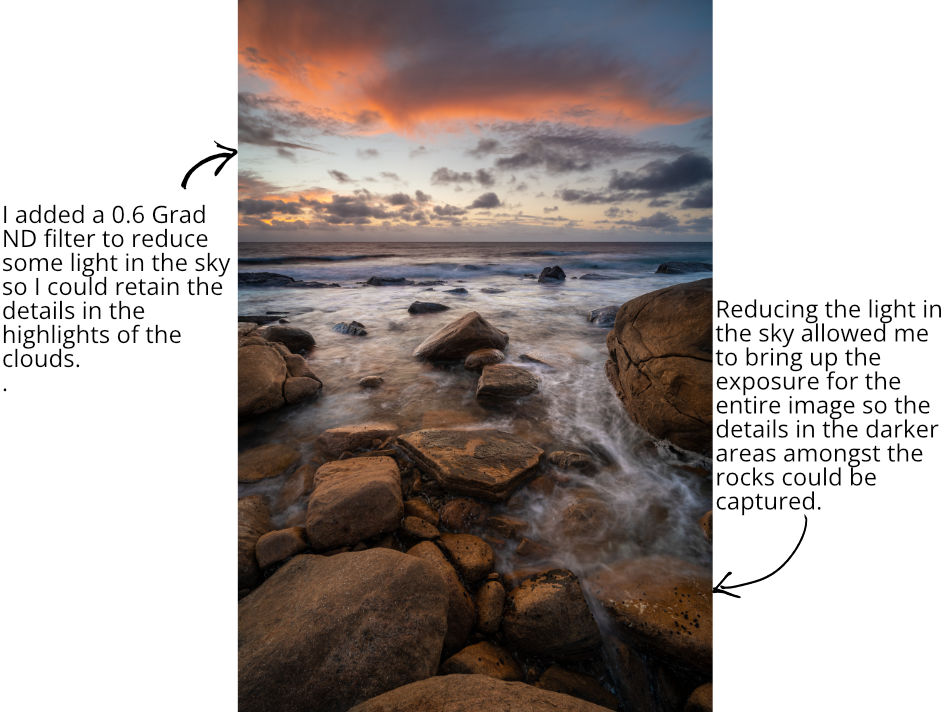
I used a 0.6 Graduated ND Filter to remove some of the light in the sky.
With the highlights saved, I also had the freedom to increase the exposure across the image, which uncovered details in the shadow areas of the scene.
Having the details in the shadows and highlights helps make the landscape or seascape more engaging and interesting to the viewer.
Create Longer Exposures with Neutral Density Filters
Solid Neutral Density (ND) Filters have a consistent tint or density, so when applied, they remove light evenly from across the entire scene.
Essentially, ND filters reduce some of the light to slow the shutter speed without adjusting the ISO or Aperture.

NiSi ND Long Exposure Kit
Included in this kit is a 3-stop, 6-stop and 10-stop filters so you can set up long exposures in most light conditions. Perfect for any landscape scene, including seascapes.
In other words, the shutter can be opened longer while the image is taken because the Solid ND filter removes some of the light from the entire scene.
The heavier the ND filter, the more light is removed and the longer the shutter speed can be.
Determining how much light passes through the lens and controlling the shutter speed allows photographers to be more creative in what the camera captures.
How Does a Neutral Density Filter Improve Seascape Pictures?
Slower shutter speeds affect how moving elements are captured in a photo. This is helpful in seascapes scenes that usually have subjects and elements moving around, like water, clouds and waves.
When I took this photo at the beach, there was still a fair amount of light in the scene. I wanted a shutter speed between 1/4 and 2/3 of a second, but my shutter speed was too quick with the aperture and ISO set for the correct exposure.
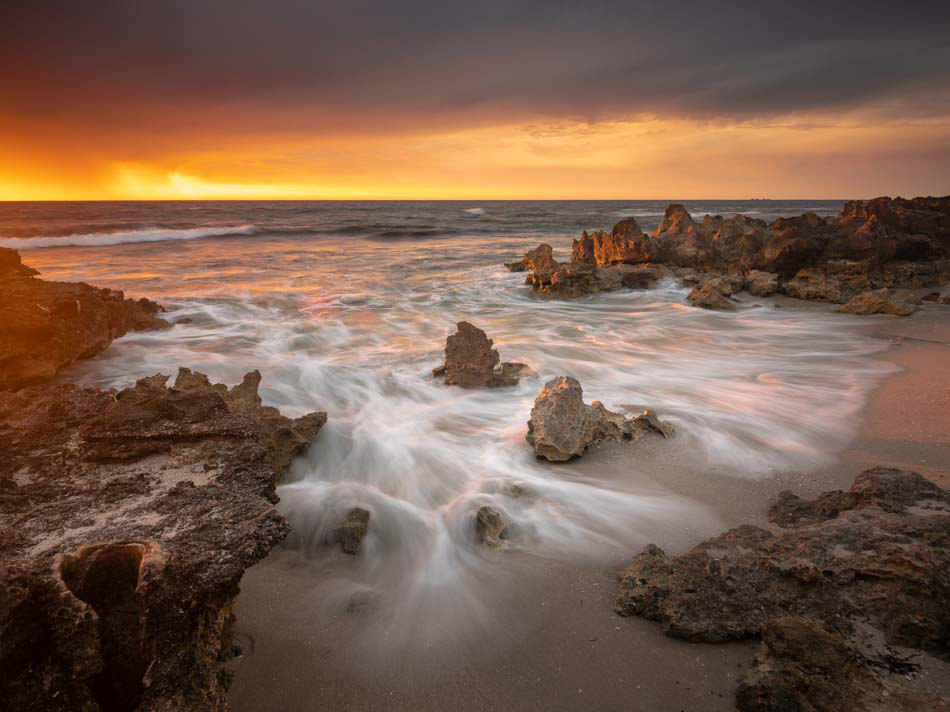
To remove some of the light, I added a 3-stop filter, giving me a shutter of 1/2 of a second. The longer exposure captured the foam as it pushed up the beach, creating these drawn-out patterns providing leading lines that draw the viewer’s eye into the rest of the scene.
In this Seascape photo, I used a 6-stop ND filter the slow the shutter to 4 minutes. The extending shutter speed impacted how the moving water of the sea was captured. Instead of the water being choppy and potentially distracting, the water is smooth.
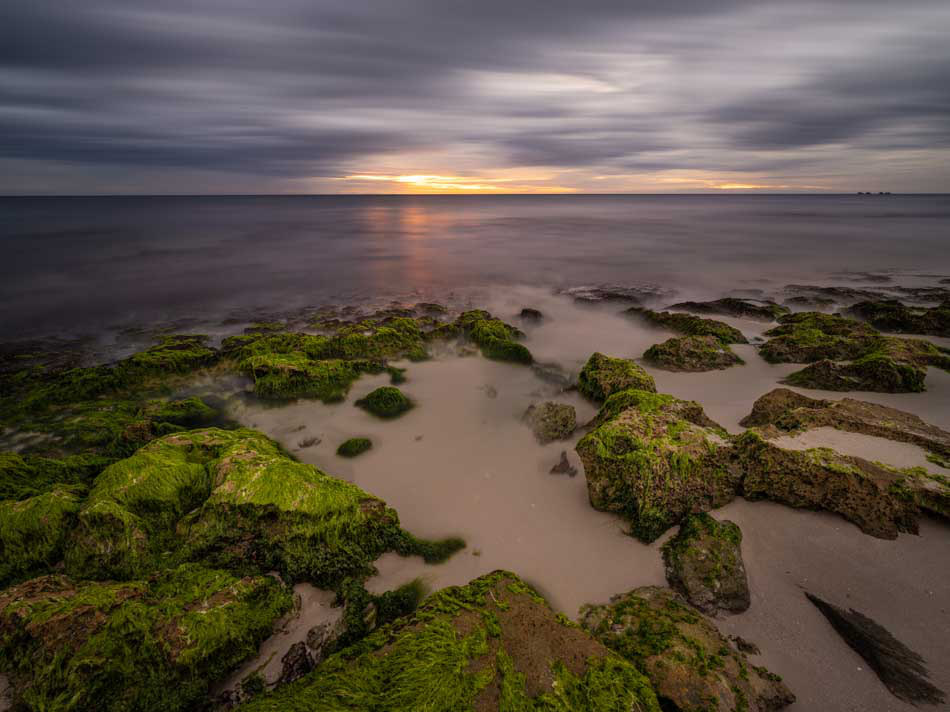
This effect helps the viewer not to be distracted by the messy detail of the water but instead helps draw the eye to the detail captured in the rocks and moss in the foreground.
What’s the Best Filter System for Seascapes?
I prefer a Filter Holder system that allows me to mount square filters to the front of the lens. I can attach the Filter Holder to any of my lenses using the adapter rings regardless of the thread size.

NiSi Starter Kit
This Starter Kit from NiSi is an excellent way to begin your journey with filters for landscape photography.
Screw-on filters are a cheaper option, so they are suitable for beginners starting their photography journey who may only have one or two lenses. However, once you start building up a range of lenses, you need to purchase a set of screw-on filters that match the thread size of each lens you intend to use.
In Addition, when shooting on the beach with water and sand flying everywhere, I find it easier to swap out filters on the holder system than attempting to screw on and off filters.
QUICK RECAP
Seascape scenes can have challenging light conditions in which to shoot.
Building up a set of different filters can be an invaluable tool for controlling the light in seascapes so the camera can capture the detail in the scene.
A Circular Polarizer is a must for reducing glare and reflections.
Grad ND Filters are ideal for evening out light across a seascape scene.
Solid ND Filters allow photographers to capture seascapes with moving elements creatively.