As I patiently wait for the light for my next landscape, I realize I use similar settings to capture most of my landscape images. So what are the best camera settings for taking a landscape photo?
The best settings for landscape images are to shoot in RAW with an Auto White Balance. Use the camera’s base ISO of 100, and have the Aperture between f/11 to f/16. Select a Shutter Speed of 1/100 seconds to freeze any movement. For blurring moving water, a Shutter Speed between 1/3 to 2/3 of a second is ideal.
These are the best camera settings when taking a landscape photo.
- Format: RAW
- Crop Mode: 3:2
- White Balance: Auto
- Metering Mode: Average
- Focusing: Single Point
- Camera Mode: Manual or Aperture Priority
- ISO: 50 to 100 (Base ISO of Camera)
- Aperture: f/11 to f/16
- Shutter Speed: 1/100th second (Freeze movement), 1/3 to 2/3the Sec (Blur movement)
- Drive mode: Single shot
Setting up your camera properly and dialing in the correct settings to capture a scene is one of the 5 Core Principles of Landscape Photography that build the fundamentals of creating beautiful and impactful photos.
The exact settings used will depend on the scene you are shooting, the available light, and the effect you are trying to achieve in your landscape images. So let’s take a closer look at each setting.
Shoot Landscape Photos in RAW
When it comes to landscape photography, I want the image to be captured at the highest quality, as large as I can, and with the most detail. So I shoot all my landscape images in RAW.
RAW format results in a file with the maximum amount of data captured by the sensor for the most detail and dynamic range. The camera applies a minimal amount of processing to the RAW file. As a result, a RAW image can look desaturated. However, with some basic Post-Processing applied, you can bring out the full dynamic range, color, and detail of the file.
Utilize the Full Crop of the Sensor
Regardless of whether you are using a camera with a cropped sensor, Full-Frame, or Medium Format sensor, you should set the image’s ratio to the native size of the sensor. So you are maximizing all of the pixels on the sensor. Most cameras have a sensor with a 3:2 ratio crop, but other cameras may differ.
| APS-C | Ratio 3:2 |
| Full Frame | Ratio 3:2 |
| Fuller Format (Fujifilm) | Ratio 3:4 |
| Medium Format | Ratio 3:4 |
In addition to choosing the native ratio of the sensor, select the largest image size available. These two settings ensure you have the most detail (using all pixels on the sensor) and the least amount of compression to the file. So you have the most amount of information captured in the file when you are editing the image in post-processing.

What is the Best ISO Setting for Landscape Photos
Set the ISO to the base ISO of the camera. For most cameras, that’s ISO 100. The ISO refers to the gain or how much the camera amplifies the readout from the sensor.
You can think of it as the sensitivity of the sensor. The higher the ISO, the more sensitive the sensor is to light. However, a higher ISO while boosting the readout will have more noise in the image. The Base ISO, sometimes referred to as the Native ISO, will have less noise and result in the best quality image while being less sensitive to light.
The base ISO for some popular landscape cameras are:
| Nikon D850 | Base ISO 64 |
| Nikon Z 8 | Base ISO 64 |
| Nikon Z 7 | Base ISO 64 |
| Canon EOS 5DS R | Base ISO 100 |
| Sony A7R IV | Base ISO 100 |
| Pentax K-1ii | Base ISO 100 |
| Fujifilm GFX100S | Base ISO 100 |
| Fujifilm GFX50R | Base ISO 100 |
| Fujifilm X-T4 | Base ISO 160 |
| Fujifilm X-T5 | Base ISO 125 |
The ISO is one of three settings that impact the exposure of an image. The other two settings are Aperture and Shutter Speed.
Best Aperture Settings for Landscape Photography
Set the Aperture between f/11 and f/16 will give you a large Depth of Field (DoF), so the entire scene in focus.
The Aperture determines the Depth of Field. Depth of Field refers to the distance between the closest and furthest object from the camera that is in focus.
Landscape images where all of the static elements are in focus are more pleasing to the eye. The smaller the Aperture, the larger the Depth of Field is. While Apertures above f/16 will further increase the DoF, it will also introduce slight blurriness to the image caused by diffraction.
Note: Diffraction is a physics property of all lense caused by the light bending (diffracting) as it passes through a small hole (Aperture).
To learn more about Depth of Field as well as how other settings affect an image, check out this DoF Simulator
What’s the best Shutter Speed to use for Landscape Pictures?
Select a fast Shutter Speed, 1/100 of a second, or quicker to freeze any movement in the scene. Select a slower Shutter Speed, like 1/3 of a second, or more if you want to create a blurred effect in your landscape image.
The Shutter Speed is the amount of time the shutter opens and exposes the sensor to light from the scene. Several factors that determine the ideal Shutter Speed for a particular location include the amount of light, how much the camera might move (whether you have the camera mounted to a tripod), and if anything is moving in the scene.
Camera Movement
If the camera is hand-held, you’ll require a relatively quick shutter speed to reduce the likelihood of a blurred image due to camera shake. On the other hand, a camera mounted to a tripod can have a longer shutter and still retain a shape image.
Available Light
When there is plenty of light in the middle of the day, a quick shutter is required, so the image is no overexposed. However, in low-light scenarios like sunset or sunrise, you might need a longer shutter to capture enough light and expose the scene correctly.
Freezing Movement (Leaves)
If the scene you are shooting has some unwanted movement, like wind blowing around leaves on a tree or long blades of grass, you’ll need to dial in a quick shutter speed of around 1/100th of a second or faster to freeze any moving elements. The shorter the shutter time, will capture less light. Decreasing the amount of light may need to be compensated with a wider aperture to prevent the image from being too dark (underexposed).
Blurring Movement (Water)
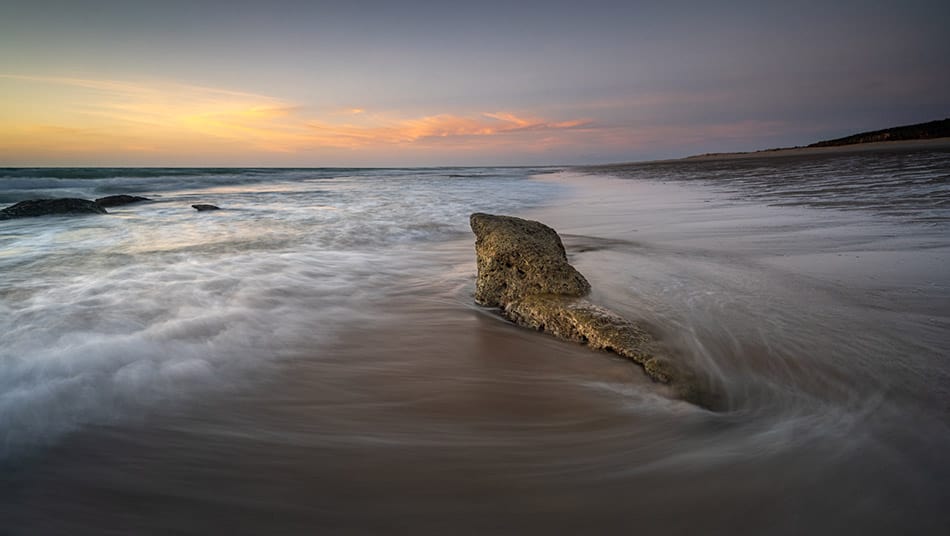
If you want to capture the motion of elements, like waves at a beach, consider a longer shutter speed between 1/3 to 2/3 of a second. The amount of water and the rate that water is moving will impact the shutter speed. When I’m shooting a seascape, I’ll often experiment with various shutter speeds and check the image on the back of the camera to see the effect each timing creates.
What is the Best White Balance for Landscape Photos
If you shoot in RAW format, leave the White Balance set to Auto as you can change the White Balance of a RAW image in Post-Processing. This approach is much easier as you don’t have to adjust the White Balance as lighting conditions change.
I prefer to determine the white balance as part of my editing process once I can see the image presented on the computer.
Select a Metering Mode that Meters the Entire Scene
When I’m in the field, I’ll often use the Electronic View Finder (EVF) to compose the image initially. However, I tend to use the LCD screen on the back of the camera to monitor the scene as I’m taking to shot, so I have the screen set up with information to help make this easier.
I have the Exposure Indicator displayed, and I have the Metering Mode set to Matrix (Nikon). In this Mode, the camera averages the light from zones across the scene and gives me a value, shown on the Exposure Indicator.
Another option is Average Mode, which averages the light without using the zones. However, the metering can get confused with some lighting conditions.
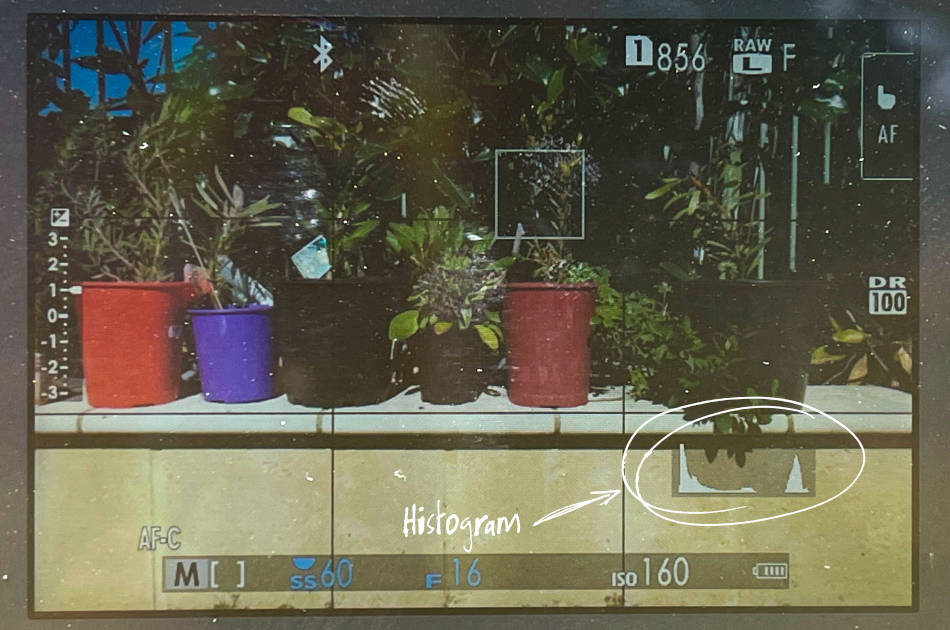
For more exposure information, I also have my Histogram displayed on the LCD screen. From the Histogram, I can check the tonal values across the entire scene and check I’m not clipping any highlights or shadows, plus monitor if my image is generally too dark or too light. I find the Histogram much more helpful than just the Exposure Indicator on its own.
Best Focus Mode to Use for Landscape Scenes
Set the Focus Mode to Single Point and dial it down to either the smallest or one size larger to pinpoint the exact spot where the camera will focus. Next, position the Focus Point over a part of the scene with plenty of contrast, roughly one-third of the way into the scene.
With a Depth of Field from the Aperture mentioned previously (f/11 to f/16) and the camera focused on a point at the lower third, focus throughout the entire image will be achieved in most situations.
Back Button Focusing
Something else I set up on each camera I use is Back Button Focusing. I find Back Button Focusing (BBF) an advantage to use for two reasons:
- Removing the focus feature from the shutter button (half-press) ensures the camera doesn’t focus automatically every time you press the shutter button. You can also do this by switching into Manual Focus mode, but this is approach is much quicker.
- It provides a seamless way to move from autofocusing to manual focusing whenever required.
I find BBF a more intuitive way to focus the camera. But, as with any change, you need to allow time to get used to it.
100% Zoom to Check Focus
I customize a button on the camera to punch in 100% into the scene to quickly check my focus on the back LCD screen before I take a shot.
With this setup, these are the steps I follow to focus the camera.
- I position the point where I want to focus. In most cases, it’s roughly a third of the way into the scene where there is some contrast, so it’s easier for the camera to focus.
- I hit the back button to autofocus the scene.
- I then press the back dial that I’ve set up to zoom in 100% to check the focus and then either press the back button again to refocus or manually adjust the focus using the focus ring on the lens.
Shoot Landscape Images using Manual Mode?
I use Manual Mode because I don’t want the camera to decide how the image will be exposed, particularly if the scene changes with the light or things moving like waves that can quickly change the tonal values. Plus, I have all the information I need to expose the image correctly using the Histogram and the other information displayed on the back screen.
I shoot in Manual Mode pretty much all the time. Manual Mode is just better for me because it suits the way I think. However, I know some landscape photographers like to use Aperture Priority Mode because they find it more manageable.
Addition Accessories for Landscape Photography
With the main settings covered, there are a few features of the camera and some accessories I use when I’m shooting landscapes that I wanted to mention.
Set up Information on the LCD Screen
As I said before, I use the LCD Screen for checking my composition and focus. To help with how I compose my shot, I’ll sometimes add a nine-cell grid across the display that shows the vertical and horizontal thirds guide.
I also use the LCD to monitor my exposure using the Live Histogram that I’ve set up to display before taking a shot. I can also see the exposure settings I’ve dialed in, at a glance, down the bottom of the screen.

Many modern cameras now have back screens that tilt, making it easier to view this information. I find this helpful because regardless of the angle I have the camera positioned, especially if it’s low to the ground, I can reference my settings and monitor the image. In addition, you can customize the information displayed on the screen to suit your shooting style and workflow while out on location.
Use a Shutter Release Cable
I use a remote shutter release cable to trigger the shutter when I want to avoid touching the camera when taking a shot and minimize camera shake. If nothing is moving in the scene, I’ll sometimes use the camera’s self-timer, set to 2 seconds. With the camera mounted to a tripod, a 2-second timer is enough time for the camera to stop shaking before it automatically takes the shot.
In situations where I want to take a shot with precise timing, like in a scene where I have a wave crashing over some rocks, it’s challenging to accurately fire off the shutter at the right moment using a 2-second delay. That’s when a remote shutter is handy.

Pixel Remote Shutter Release Cable
An inexpensive remote shutter cable that is reliable and doesn’t require messing around with wireless connections. Available for all makes and models of cameras.
There are two types of shutter remotes, cabled and wireless. I use a cabled generic brand that is inexpensive. I have two, in case one stops working. If I accidentally drop one in the water, I can easily replace it.
I’ve found the wireless versions can lose the connection sometimes, and they’re more expensive. Plus, the cabled versions are convenient and don’t have a battery that needs recharging or replacing.

Pixel Wireless Remote Shutter Release
A wireless solution to remotely trigger the shutter avoids any camera shake risk. Available for all makes and models of cameras.
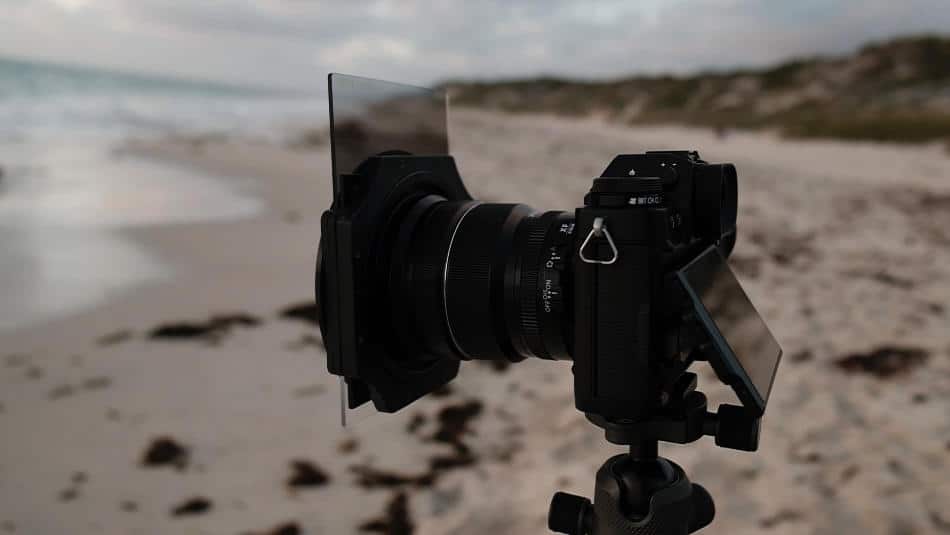
Use Filters to Control the Light
I also use various filters on my lenses, including Polarizers, Neutral Density Filters, and Graduated Filters. I’ll select the filters based on the scene, the amount of light, and the effect I’m trying the create.
You can think of filters as a way of controlling the light that enters the lens.

Polarizer Filters
You use a polarizer to control scattered light, to reduce glare off water surfaces and wet objects like rocks and leaves. I use a Circular Polarizer (CPL) for capturing most landscape scenes because you can not replicate its effect on the image in Post-processing.
Neutral Density Filters (ND)
Filters with a neutral density are great for reducing the light across your entire image. With less light, you can have the shutter open longer to capture the scene and not overexpose the shot. Use ND filters for taking long exposures or in situations where there’s lots of light.
Graduated Neutral Density Filters (ND Grads)
A Graduated Neutral Density Filter is similar to an ND Filter. However, only half of the filter has the ND effect, and it graduates to clear. ND Grads are great at reducing the light from a portion of a bright scene. In so doing, the light becomes more even across the image.

NiSi Starter Kit
This Starter Kit from NiSi is an excellent way to begin your journey with filters for landscape photography.
QUICK RECAP
I’m not telling you that you must have your camera set up this way with these settings, but in my experience shooting Landscapes photos, these are the settings I use most of the time to capture my landscape images.
It doesn’t matter what Model or Make of camera you have. I try and use these settings on any camera I use for landscapes.
All of these settings at once can seem daunting, but the more you practice, the better you get at developing your workflow when you’re in the field. It becomes easier to select the best settings for a location the more time you spend taking photos.
Over on my YouTube Channel, I share my landscape photography adventures and how I approach capturing photos in different locations. I talk through why I choose the setting I use for a particular shot and the challenges I encounter when in the field.